Capturing receipt lines
Summary
Capture is where the operator records what actually came off the truck. It is designed for tablets and barcode scanners: scan a product and a line is added; scan it again and the quantity goes up by one. Each line carries its quantity, location and, when needed, damage, package, lot, photos, dimensions and notes.
Nothing captured here touches stock: that only happens when the supervisor confirms.
Before you start
- Permission: “Capture Receipts” (Super Admin, Admin, Supervisor and Worker by default).
- The receipt must be Pending, In progress or Captured. A confirmed one is fixed with Edit; a cancelled one can no longer be changed.
- Catalog: the client’s products with their barcodes on the packaging levels, so the scanner recognizes them. See Products and units.
- Active locations in the warehouse. See Location when receiving.
Opening capture
- From the detail of a Pending or In progress receipt, click Capture receipt (next to the step bar).
- When you create a walk-in receipt or a partial receipt, you land here directly.
- If the receipt is already Captured: on the detail page, Edit capture is in the more actions menu (the three dots); on the review screen, it is a button next to Confirm receipt.
If the supervisor returned the receipt, you will see the Review history with their notes at the top: read them before fixing.
The header: truck and delivery
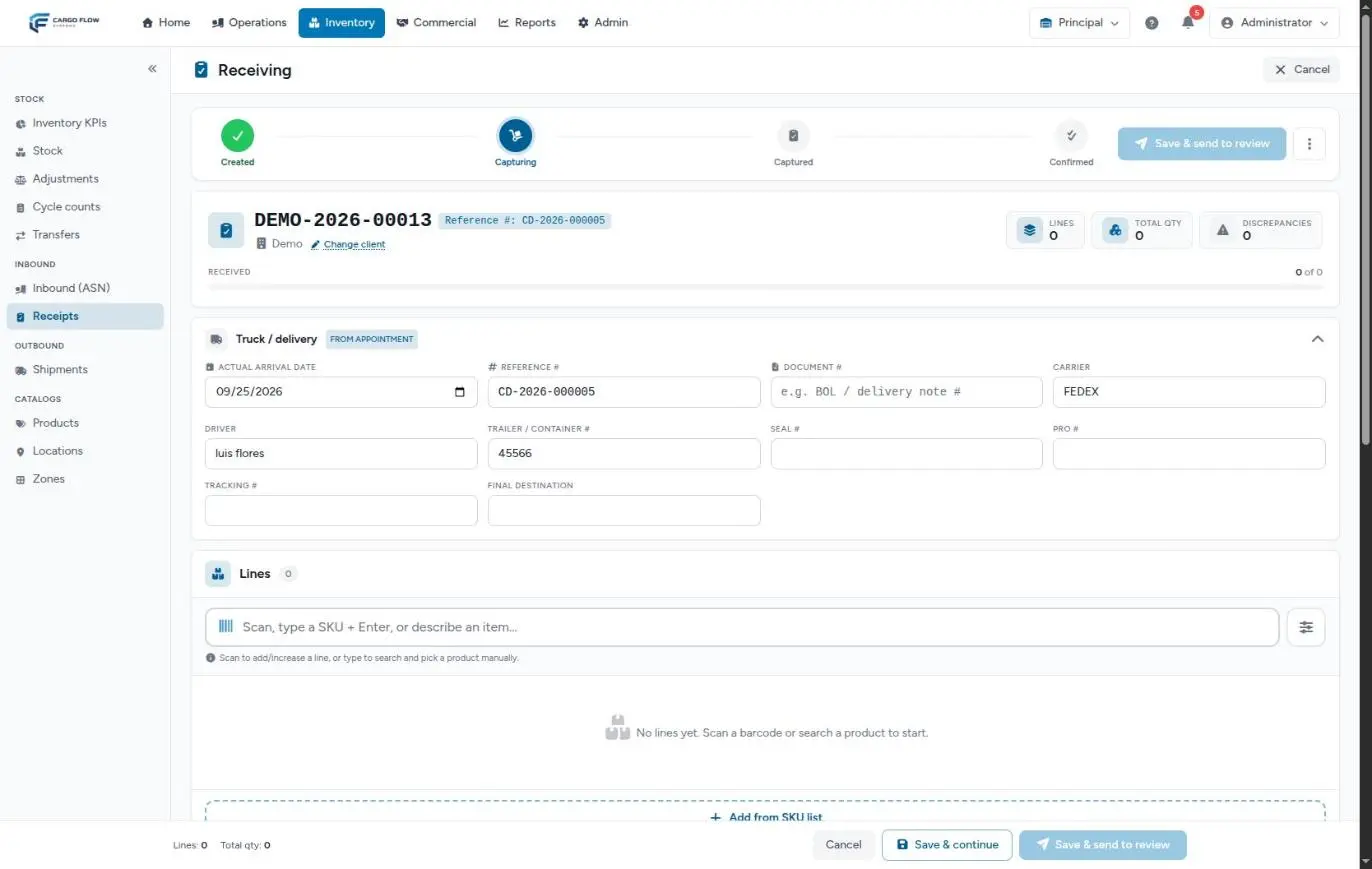
At the top are the receipt number, the reference, the client (with Change client if you have permission), the notice number if any, and the Lines, Total qty and Discrepancies counters, plus a bar of received lines against the total.
The Truck / delivery section stores: Actual arrival date, Reference # (with the duplicate warning), Document #, Carrier, Driver, Trailer / Container #, Seal #, PRO #, Tracking # and Final destination. If the receipt is linked to a dock appointment, it shows the From appointment badge and comes prefilled with the driver details; extra fields from the driver registration are shown read-only. On small screens the section is collapsed: tap it to open.
Adding products
There are three ways, all from the Lines section:
- Scan — with the cursor in the “Scan, type a SKU + Enter, or describe an item…” field, scan the code. The system looks first for a barcode (piece or case) and then for an exact SKU. If the product was not on the receipt, a line is added with quantity 1 in the unit of the scanned code; if it was, its quantity goes up by 1. A short message confirms “Line added” or “Quantity increased” with the SKU.
- Type and search — type part of the SKU or name and pick from the results with a click or the arrows and Enter. See more results… opens the search window with the whole catalog.
- Add from SKU list — the button below the lines adds a blank row and opens the Find a product window to choose calmly.
Only products of the receipt’s client (and the warehouse’s general products) show up. You cannot add another client’s product.
When the code does not exist
If what you scan or type and confirm with Enter matches no barcode and no SKU of the client, the system does not show an error: it takes it as the description of a new item, creates a one-time product on the spot with that text as its name, and adds it as a line.
Goods that are not in the catalog
If something arrives that does not exist as a product (an unlabeled pallet, mixed freight), type a description in the same field and choose Add item: …. The system creates a quick product for the client, with a generated SKU, and adds it as a line. It goes into stock like any other and can be shipped later.
- From the scan field, the item is always one-time: it will not be suggested on future receipts and in the product list it carries the “One-time” badge (hidden by default).
- From the Find a product window, the Create new: “…” button comes with the Use once box checked. Uncheck it if you want the product to stay in the client’s catalog for reuse.
The data on each line
Each line shows the product, the expected quantity (if it came from a notice), the received quantity with plus and minus buttons, the button to set the expected quantity and the unit. Below are buttons that each open a panel; they turn colored when something is missing (amber or red) or complete (green):
| Button / panel | What you capture | Required to confirm? |
|---|---|---|
| Location | Where the goods are put away. Search by location code. | Yes, if the line has a received quantity (with the inventory module). |
| Package | Pallet, Case, Box, Carton, Each, Drum, Bundle or Bag. | No, but “Pallet” plus the number of pieces sets how many per-pallet labels print. |
| Lot # | Lot number (up to 64 characters). Only on lot-tracked products. | Yes, on those products. See Lots when receiving. |
| Evidence photos | Photos of the goods (on a tablet it opens the rear camera). Images up to 5 MB each; uploaded when you save. | Yes, on every discrepancy line. |
| Discrepancy | Discrepancy type and damaged quantity. | — |
| Dimensions and weight | Pieces, length × width × height (inches or centimeters), total line weight (pounds or kilos) and volume, which is calculated automatically. | No, but used for weight or volume billing. |
| Notes | Line notes and, if the client has them, their custom fields (list, checkbox, text). | No. |
When you add a product, the catalog dimensions are preloaded for the captured level (receiving in cases brings the case dimensions) and can be changed if the real package differs. Weight is deliberately not preloaded: it is the line’s total weight; if you leave it empty, weight billing uses the catalog weight per unit.
Quantities and units of measure
- The unit is chosen per line when the product has several (each, case, pallet). If it has only one, it is shown as text.
- On confirmation, stock is always stored in the base unit: capture 2 cases of 12 and 24 pieces go in.
- Quantities accept decimals and cannot be negative.
- The received quantity includes the damaged ones: if 10 came off and 2 are broken, capture 10 received and 2 damaged.
Discrepancies and damage
The system suggests the discrepancy by comparing received against expected: more is Over-received (“Over” badge), less is Short (“Short”). A line that was not on the notice (expected 0) is never flagged as over. Damaged and Wrong SKU are chosen by hand and the system no longer changes them even if you move the quantity.
Shortcuts for large captures
- Receive all as expected — green button next to the search box, only on receipts that come from a notice with expected quantities: sets each line to its expected quantity. Use it only when everything really arrived.
- The settings button (sliders icon) opens Default location (all lines) and Default package (all lines): they apply to every existing line, replacing whatever it had, and to the lines you add afterwards.
Save & continue or send to review
| Button | What it does |
|---|---|
| Save & continue | Saves progress and keeps you in the editor. The receipt becomes In progress (even if it was Captured). Nobody is notified. It can be saved even without lines. |
| Save & send to review | Saves and moves the receipt to Captured. Notifies supervisors and admins. Requires at least one line (the button is grayed out if there are none). There is an identical button in the step bar at the top. |
| Cancel | Leaves the editor without saving your changes. It does not cancel the receipt. |
Every save records the person who saved as the capturer. Lines you remove in the editor are deleted from the receipt on save; since it is not confirmed yet, there is no stock to reverse.
Supplier documents (packing list, proof of delivery) can be attached from the Documents panel at the bottom of the editor. See Photos, documents and dock job.
What arrives already captured from the dock
- If the receipt is linked to a dock job, the operator can record each line’s quantity and location from their app; those values appear here and the receipt moves to In progress. See Operator app.
- If the dock receiving record was filled in with hand-written rows, those rows arrive as new lines (one-time items) when the job is finished. Rows without a quantity arrive at 0 with the note “No quantity captured at the dock…”: enter the real quantity before sending.
Example
A Pacific Brands receipt brings, from the notice, 24 cases of SKU MP-SHAM-400 (unit CS, 12 pieces per case). Luis Pérez opens capture, sets default location A-03-01 and package Case in settings, counts 24 cases and clicks the expected quantity button. On inspection, 1 case has 3 broken bottles: he switches the line unit to each, captures 288 received and 3 damaged, chooses Damaged, takes the photo and sends to review. On confirmation, 288 pieces go in, 3 set aside as damaged.
Messages you may see
| Message | What to do |
|---|---|
| “Progress saved. You can keep capturing this receipt.” | You saved with Save & continue. |
| “Receipt … captured. Awaiting supervisor review.” | It was sent to review. |
| “This product does not belong to the receipt client.” | The product belongs to another client. If the receipt is the one with the wrong client, use Change client. |
| “The selected location does not belong to this warehouse.” | Pick a location from the list; only active locations of the receipt’s warehouse are accepted. |
| “The … field must be an image.” or a size error on photos | Each photo must be an image of up to 5 MB. Choose the photos again: if the save bounces, the selected photos are not kept. |
| “Could not create the item. Please try again.” | Creating the manual item failed (connection). Try again. |
Best practices
- Scan instead of typing: it avoids SKU errors. And watch for lines named after a code.
- Capture while you unload and use Save & continue often; if the tablet runs out of battery you lose nothing.
- Take the photo when you see the damage, not at the end.
- Assign a location to every line before sending to review: without it the receipt cannot be confirmed.
- Do not use Receive all as expected without counting.
- Capture the real line weight when the client pays by weight.
Troubleshooting
I scanned and a line named after the code appeared.
- The code is not registered on any product of the client and a one-time item was created. Remove that line, search the product by name and add the barcode to the product.
The Save & send to review button is grayed out.
- The receipt has no lines. Add at least one.
There is no lot button on a line.
- The product is not marked “Lot tracked” in the catalog.
Photos do not upload.
- Each photo can be up to 5 MB and must be an image. Lower the camera resolution if needed.
I saved and the receipt went back to In progress.
- You used Save & continue on a receipt that was already Captured. Click Save & send to review to put it back in review.
Frequently asked questions
Can I remove a line that came from the notice?
Yes, as long as the receipt is not confirmed. But if the product simply did not arrive, it is better to leave the line at 0: it is flagged Short and the customer sees the difference against their notice.
Which unit do I capture in?
The one you are counting in (pieces, cases, pallets), selected on the line. The system converts to the product’s base unit on confirmation. With damage or partial receipts, prefer the notice unit or the base unit.
What happens if I leave without saving?
The editor warns you about unsaved changes before leaving. If you leave anyway, whatever you did not save is lost.
How do I clear a truck field that was already filled in?
Leaving the field empty does not clear it: the system keeps the previous value. Replace it with a dash or the correct value.
Need help?
If something did not work as expected, our support team can help you.
Was this article helpful?