Receipt photos, documents and dock job
Summary
Every receipt has its file: photos, supplier paperwork, generated PDF documents and its link to the dock job where the truck was unloaded. Everything is managed from the receipt detail, and much of it also from the capture editor and the review, so the operator can attach while unloading.
Before you start
- Documents module enabled for the warehouse: without it the documents panel, attachments and printing do not appear.
- Permissions: “Generate Documents” to attach and print (Super Admin, Admin, Supervisor, Worker); “Manage Document Templates” to delete attachments (Super Admin, Admin); “Confirm Receipts” to choose the email photos; “Capture Receipts” to link or unlink the dock job.
- To link: the docks module enabled and a delivery job for the same client (or with no client).
The receipt detail
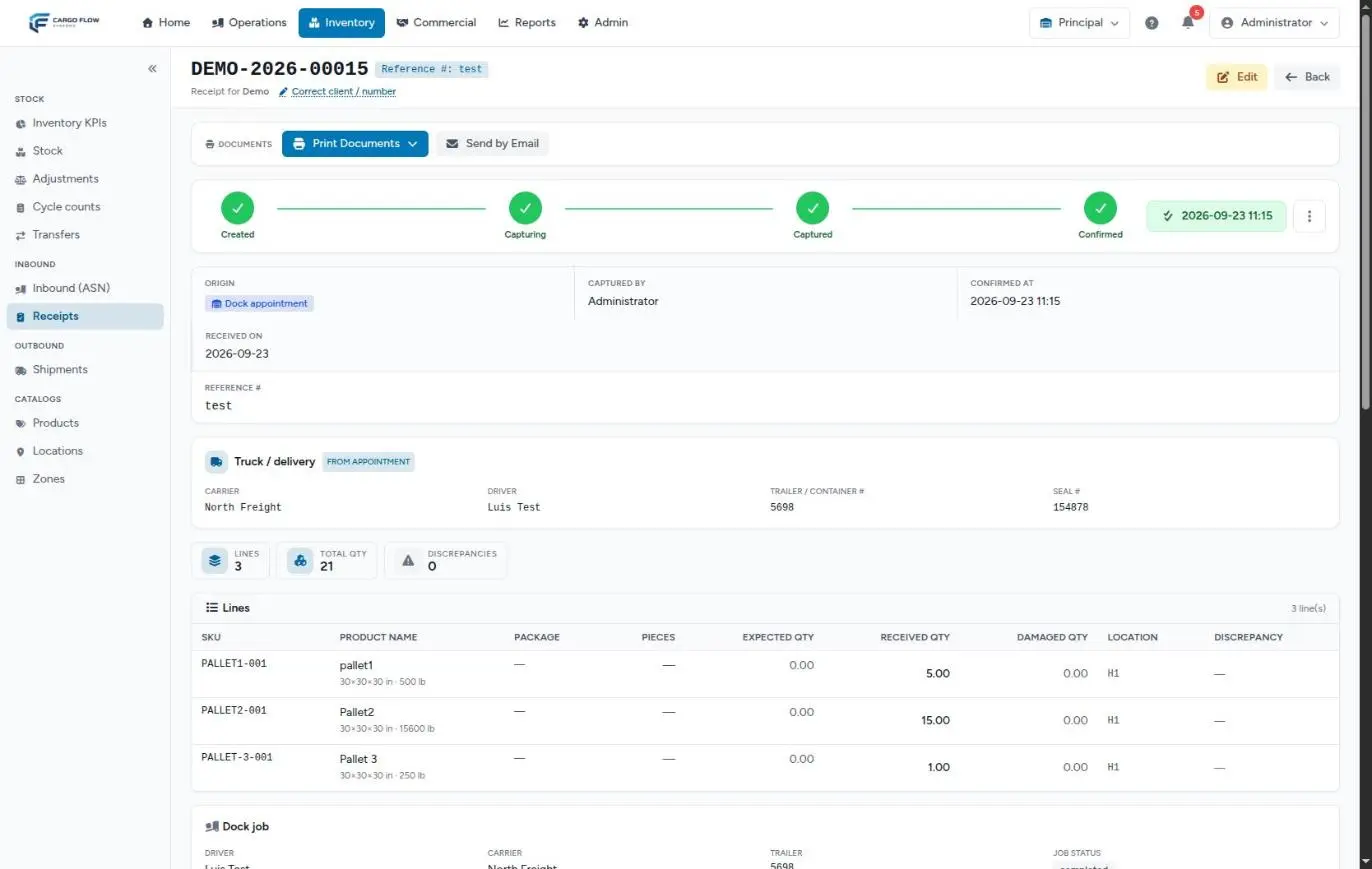
From top to bottom: the number and reference (with Edit and Correct client / number depending on your permissions); the Documents bar with Print Documents and Send by Email (confirmed receipts only); the cancellation box or review history, if any; the step bar; origin, who captured, dates; truck details; lines; the dock job card; accessorials; the documents panel; and the identity correction with its history.
Three kinds of photos
| Photos | Where they come from | Where they show | Sent to the customer? |
|---|---|---|---|
| Line evidence photos | Taken by the operator during capture, in each line’s photo panel. | On the line, in capture, review and detail. | No. |
| Dock job photos | Taken by the dock operator during unloading. They are not copied: the receipt shows them from the linked job. | In the receipt’s documents panel. | The ones the supervisor marks, if the customer receives photos. |
| Attached photos | Uploaded as an attachment, like a PDF. | In the attachments list. | If marked “Send in notifications” and the customer receives documents. |
All of them are kept in private storage: visible only when signed in, never through a public link.
Attaching documents
- Go to the Documents panel — on the receipt detail, the review or the bottom of the capture editor.
- Choose the file — drag it to the drop zone, click to choose it, or paste a screenshot with Ctrl+V or the Paste button.
- Say what it is — proof of delivery (POD), packing list, photo, signed BOL or other.
- Decide whether it goes to the customer — the Send in notifications box makes the file travel in customer emails.
- Click Attach.
PDF and images (JPG/PNG) up to 10 MB are accepted. Files the customer uploads from their portal when notifying the arrival carry the Portal badge. Deleting an attachment cannot be undone and requires the manage document templates permission.
Which photos and files reach the customer
This is decided by the customer’s settings (Notifications tab on their record) and, on each receipt, by the supervisor:
- Photos in the notification: — selector in the documents panel: the first option follows the customer setting (in parentheses it says Yes or No); Send for this document or Do not send for this document change only this receipt.
- Each dock job photo has a button to attach it or remove it; chosen ones carry the In email badge. Up to six go in the email, as thumbnails.
- Attachments marked “Send in notifications” travel as files, only if the customer has “Send uploaded documents” on, up to about 15 MB in total per email.
Printing and generating documents
On a confirmed receipt, Print Documents offers the warehouse receipt (master or individual version) and the labels (master, per pallet or per unit). In the documents panel you can also pick a template and click Generate PDF; the result is listed under Generated documents. Options, content and limits in Receipt labels and warehouse receipt.
Linking to a dock job
If the warehouse uses dock operations, the receipt detail shows the dock job card with the driver, carrier, trailer, status and notes.
- Link — if the receipt has no job, the card lists up to 20 active delivery jobs for the same client (or with no client). Pick one and click Link. The receipt then takes the driver details and unloading photos, and its accessorials are recorded on the job.
- Unlink — the Unlink button removes the link, for example if it was linked to the wrong truck.
- One dock job can have several receipts (a truck with goods from several notices).
A receipt can only be linked while Pending or In progress, and a confirmed one cannot be unlinked. See Dock, yard and cross-dock.
The dock receiving record
The Receiving Record Form (a sheet with seal, inspection checklist and item rows) belongs to the dock job and is filled in and printed from there. When the job is finished, the rows written by hand on that record move to the linked receipt as new lines, once, if the job has a single receipt. See Life cycle of a dock job.
Example
Luis Pérez unloads the Central Warehousing truck at dock 4 and takes four photos from his app. On the receipt he clicks Link with that job: the header fills in with the driver and seal. He attaches the supplier packing list as “Packing list”, not marked for notifications. Ana López, on the review, marks two unloading photos for the email and confirms.
Messages you may see
| Message | Meaning |
|---|---|
| “Photo added to the client notification.” / “Photo removed…” | You marked or unmarked a dock job photo. |
| “… is not open for receiving anymore.” | You tried to link a Captured or Confirmed receipt. |
| “… is already linked to another dock job.” | Unlink it from the previous job first. |
| “… belongs to a different client than the job.” | Pick the right job or correct the client. |
| “A confirmed receipt cannot be unlinked.” | The link is fixed after confirmation. |
Best practices
- Attach the supplier packing list during capture, not afterwards.
- Choose the email photos before confirming.
- Mark Send in notifications only on what the customer needs to see; leave internal papers unmarked.
- Link the receipt to the right dock job before capturing, so you do not type the driver details twice.
Troubleshooting
I do not see the documents panel.
- The warehouse does not have the documents module.
The unloading photos do not show up.
- The receipt is not linked to the dock job where they were taken. Link it from the dock job card.
The job is not in the list to link.
- The job is not a delivery, is finished or cancelled, belongs to another client, or there are more than 20 active. Check the dock board.
I cannot unlink the receipt.
- It is already confirmed. If the link is wrong, tell a supervisor: the receipt would have to be cancelled and redone.
The attachment did not arrive in the email.
- It was not marked “Send in notifications”, the customer does not have “Send uploaded documents” on, or the email exceeded the size limit.
Frequently asked questions
Does the customer see the attachments?
They see them in their portal and, if you marked Send in notifications and their settings allow it, they also get them by email.
Where do I print the receiving record form?
That form belongs to the dock job, not the receipt: fill it in and print it from the unloading dock job.
Can I delete an evidence photo?
The editor has no button to remove evidence photos already saved; new ones are added. If you uploaded a wrong photo, explain in the line notes which one counts.
Need help?
If something did not work as expected, our support team can help you.
Was this article helpful?