Receiving goods without a notice (walk-in receipt)
Summary
The walk-in receipt records goods that arrived without an advance ship notice. The form asks for only four things (client, reference, document number and actual arrival date); clicking Start receipt creates an empty receipt and opens the capture editor, where products are added by scanning or searching.
In the Origin column of the receipts list, these receipts carry the yellow label with a walking person: it means walk-in, no notice.
Before you start
- Permission: “Capture Receipts” (Super Admin, Admin, Supervisor and Worker have it by default). Without it the Create receipt button does not appear.
- Module: receiving enabled for the warehouse.
- The client must be active and operate in the warehouse you are in.
- To confirm later: the client’s products (or manual items), active locations and someone with “Confirm Receipts”.
When to use it
- A truck arrived that the customer did not announce.
- Extra goods arrived that were not on any notice.
- You need to record goods that were already physically in the warehouse (for example, a trailer that sat in the yard for a few days).
If the customer did send a notice, do not use a walk-in: find the receipt created from the notice, or use Create partial receipt if it is another trip of the same load. If the truck came in through dock operations, the receipt is created or linked from the dock assignment, so it inherits the driver details.
Creating the receipt step by step
- Go to Inventory › Receipts and click Create receipt.
- Client — type the name and pick it from the list. It is the only required field.
- Reference # — your own reference for this receipt (for example, the customer’s order number).
- Document # — the number on the driver’s paperwork: BOL, supplier delivery note.
- Actual arrival date — defaults to today. Backdate it if the goods arrived earlier.
- Click Start receipt — the receipt is created as Pending, “Receipt … created.” appears and its capture editor opens.
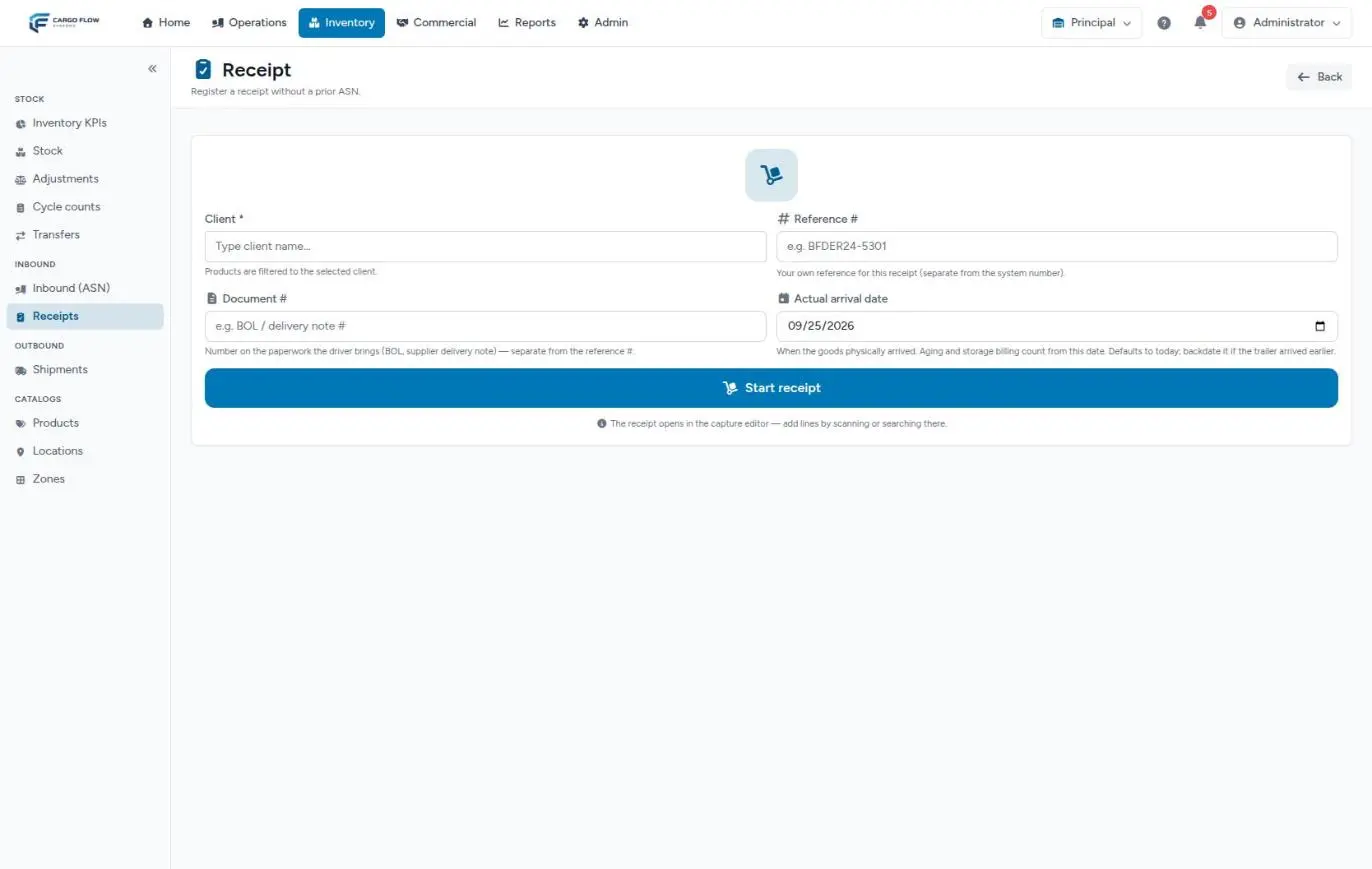
To add the products, follow Capturing receipt lines.
What each field means
| Field | Required? | What it is for |
|---|---|---|
| Client | Yes | Owner of the goods. It sets the receipt number (client sequence) and filters the products you can add: only that client’s catalog. |
| Reference # | No (up to 128 characters) | Your own reference, separate from the system number. It is searchable in the receipts list, appears in the customer email and is used to detect duplicate captures. |
| Document # | No (up to 128 characters) | The number on the driver’s physical paperwork (BOL, delivery note). It lets you match the receipt to the filed paper. |
| Actual arrival date | No (defaults to today) | When the goods physically arrived. Stock aging and billable storage count from this date. Future dates are not accepted. |
Reference, document number and date can be changed later in the capture editor, under Truck / delivery, which also holds carrier, driver, trailer or container, seal, PRO, tracking and final destination.
Duplicate reference warning
As you type the Reference #, the system checks for another non-cancelled receipt in the warehouse with exactly the same reference (ignoring case and client). If it finds one, it shows “A document with this reference # already exists:” below the field with up to five matches: number, client, status and a link to open it.
The actual arrival date
- If you leave today, the system stores the exact time. If you pick an earlier day, it stores the start of that day.
- The supervisor can change it again during review, right before confirming.
- On confirmation it dates the inbound movement, the receiving charge and the start of storage. See Reviewing and confirming a receipt.
What happens next
- The receipt appears in Inventory › Receipts as Pending, with the walk-in origin.
- Staff are alerted if the warehouse has the “New arrival notice / receipt (ASN)” event on.
- The customer sees it in their portal, in their receipts list, from the moment it is created.
- From here the cycle is the same as any receipt: capture, review and confirmation. On confirmation the stock goes in, the receiving charge is created if the rate card has one and the customer gets the email. See Receiving workflow.
Example
A Sample Imports truck arrives unannounced on Thursday with 12 pallets of mixed goods and a supplier paper numbered REM-55821. Ana López clicks Create receipt, picks Sample Imports, enters order PO-7730 as the reference, REM-55821 as the document number, keeps today’s date and clicks Start receipt. She lands in the capture of receipt IEJEM-2026-00044, scans the products that do have labels and adds “Unlabeled pallet, mixed freight” as a manual item for two pallets with no barcode.
Special cases
- The goods arrived days ago — set the correct actual arrival date from the start; storage will be billed from that day.
- The truck carries goods for two clients — create one receipt per client. A receipt only accepts its client’s products.
- The driver does carry a notice you cannot find — search Inventory › Inbound (ASN) by carrier or number before creating the walk-in; otherwise the notice will stay unreceived.
- You picked the wrong client — use Change client in capture or Cancel & create new.
Best practices
- Always fill in Reference #: it prevents duplicate receipts and it is what the customer searches for later.
- Enter the Document # exactly as it appears on the driver’s paper.
- If the goods arrived days earlier, correct the Actual arrival date from the start.
- Do not use a walk-in for loads that do have a notice: the notice would stay unreceived.
- Attach a photo of the driver’s paper in the receipt’s documents panel.
Troubleshooting
I do not see the Create receipt button.
- Your user needs the Capture Receipts permission. Ask an administrator.
The client is not in the list.
- Only operational clients of the current warehouse appear. Check you are in the right warehouse (selector at the top right) and that the client is active and assigned to this warehouse.
Error when saving the date.
- The actual arrival date cannot be later than today.
The form comes back with “The Client field is required.”
- You typed the name but did not pick an option from the list. Pick it with a click or Enter.
Frequently asked questions
Why does the form not ask for products?
Because every receipt is captured in the same editor. The receipt is created empty and products are added by scanning or searching during capture; that way the floor operator uses a single screen for everything.
Can I set a future date?
No. The actual arrival date is today or earlier. If the goods have not arrived yet, what you need is an advance ship notice.
What if I picked the wrong client?
In the capture editor, next to the client name, there is Change client (requires the amend identity permission). The receipt number is regenerated from the new client’s sequence. You can also cancel the receipt with Cancel & create new. See Cancelling or correcting a receipt.
Does the customer learn about a walk-in receipt?
They see it in their portal from the moment it is created, and get the receipt-confirmed email on confirmation, just like with a notice. See What the customer sees and when.
Need help?
If something did not work as expected, our support team can help you.
Was this article helpful?