Stock transfers
Overview
A transfer moves goods without changing how much the customer has. There are two kinds:
- Within warehouse (A → B) — from one location to another, in one step.
- To another warehouse — in two steps: the source warehouse ships it and the destination receives it.
They are under Inventory › Transfers. The screen opens on the inbox of transfers heading to your warehouse; the New transfer button opens the form. For the big picture of running several warehouses, see Working with several warehouses.
Before you start
- Permission: Transfer Inventory (Super Admin, Admin and Supervisor by default). Without it, the menu option does not show.
- Module: Inventory enabled for the warehouse (for both, between warehouses).
- Between warehouses: your user must have access to the destination warehouse, and whoever receives needs Transfer Inventory there.
- The destination location must exist. The form does not offer to create it; do so first under Inventory › Locations.
- The goods must be available (not reserved or blocked) in the source location.
Within the warehouse
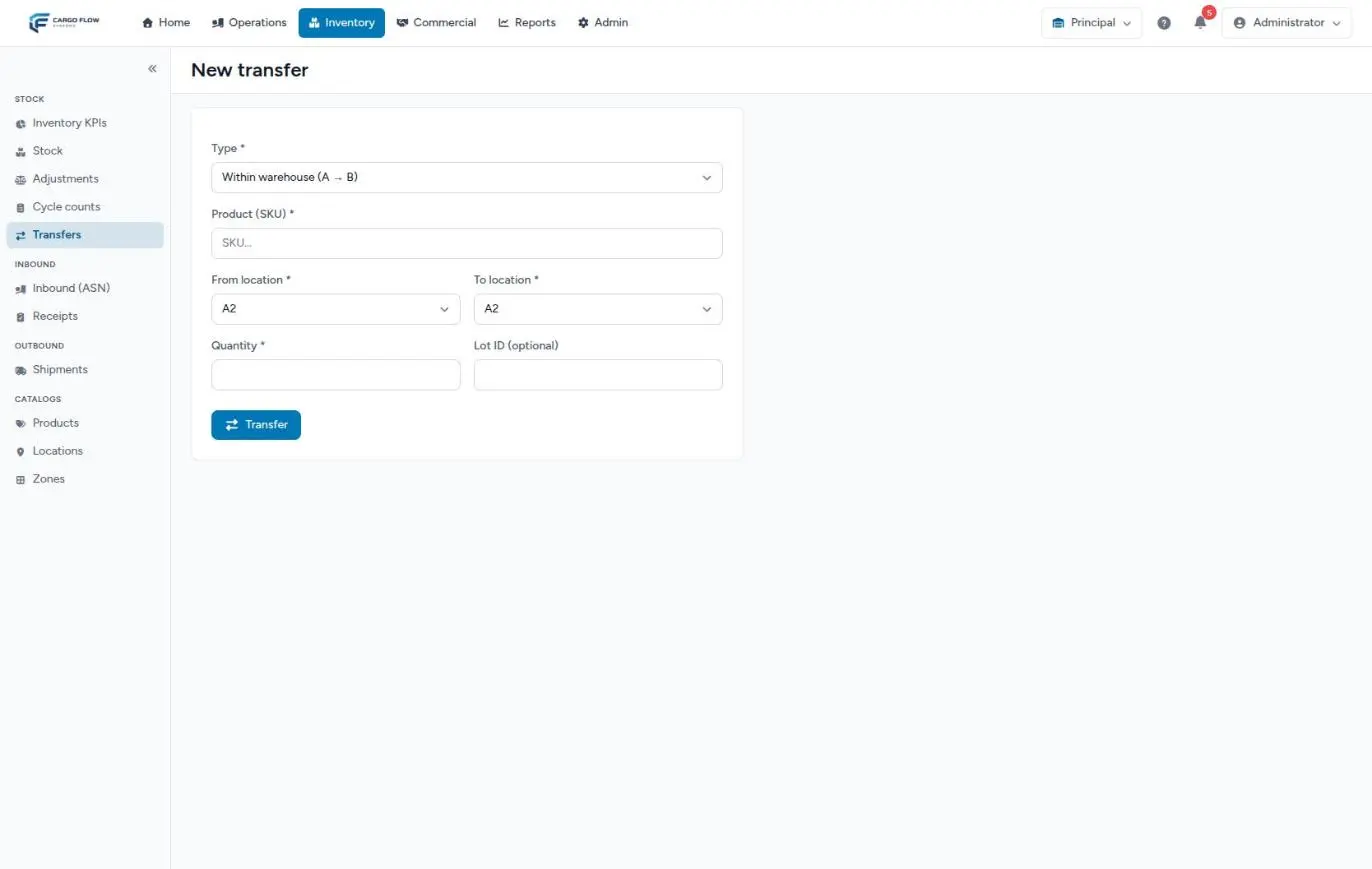
- Type — leave Within warehouse (A → B).
- Product (SKU) (required) — type the SKU or name and pick from the list. The chosen product appears below in green.
- Source location (required) — where it leaves from. The list has every location in the warehouse, active or not.
- Destination location (required) — where it goes. It must differ from the source.
- Quantity (required) — above zero and not more than what is available at the source. Decimals are accepted.
- Lot ID (optional) — only if the goods have a lot: the lot’s internal number, not the number printed on the label. Empty moves the line without a lot.
- Transfer — the movement applies immediately and you return to Transfers with the confirmation message.
To another warehouse
- Type — choose To another warehouse. The destination field changes to Destination warehouse.
- Product, source location, quantity and lot — same as within the warehouse.
- Destination warehouse (required) — only active warehouses other than the current one appear, and you can only choose one you have access to.
- Transfer — the goods leave your warehouse immediately and the transfer stays in transit.
Receiving at the destination warehouse
- Switch to the destination warehouse with the warehouse selector (see Changing language and warehouse).
- Open Inventory › Transfers — the Incoming transfers (in transit) inbox shows each one with the product, the source warehouse and the quantity, 20 per page.
- Choose the location in Receive into. The list has every location in the destination warehouse.
- Click Receive — the goods enter that location, the transfer closes as received and leaves the inbox.
Only the destination warehouse can receive. The transfer is received in full; there is no partial receipt and no record of shortages. If less arrived, receive it in full and record an adjustment for the difference.
What can be moved
- Only the available quantity of the source line. Goods reserved by shipments or in blocked states (damaged, on hold…) are not transferred. To move damaged goods to another location, return them to available, transfer them and mark them again.
- The product and locations must belong to the active warehouse.
- Lines with a serial number cannot be transferred from this screen.
- One line per transfer: there are no multi-product transfers.
What happens next
- Within the warehouse: two Transfer movements are recorded (
transfer_outat the source andtransfer_inat the destination). If the destination line did not exist, it is created with the same customer and lot, and it inherits the first-received date from the source: aging and free storage days do not restart because of re-slotting. - Capacity: if the destination exceeds its pallet capacity, the movement happens anyway and a notice is shown.
- Between warehouses, when shipping: one movement in the source warehouse (
transfer_out_interwh) and the transfer in transit. Those goods stop accruing storage at the source from that night. - Between warehouses, when receiving: one movement in the destination (
transfer_in_interwh). The new line starts its age on the day it is received. - Client portal: the customer sees their goods in the new location (the portal adds up by SKU, so re-slotting changes nothing for them). No email or notification is sent.
- Billing: a transfer does not create a charge by itself; if the move is a service you bill, record it as an accessorial.
Example: re-slotting and sending
Re-slotting. Pacific Brands has 60 pieces of MP-GEL-500 in A-03-2-1, 20 of them reserved. You want to bring the free ones down to the floor to pick faster. You transfer 40 from A-03-2-1 to A-FLOOR-01. Result: 20 (all reserved) at the source, 40 available on the floor. If you try 45, the system refuses: only 40 are available.
Sending to another warehouse. From the Principal warehouse you send 100 pieces of a SKU to the North warehouse. In Principal the line drops by 100 immediately; in North they show up in the inbox. The next day, Carlos Ruiz switches to North, picks location R-01 and clicks Receive.
Current limitations between warehouses
Best practices
- Use transfers, not adjustments, for re-slotting: a negative and a positive adjustment leave a hard-to-read history and restart aging.
- Record the transfer as soon as the goods physically move.
- Before transferring, check in Stock how much is available at the source.
- For transfers between warehouses, let the destination know: receiving promptly keeps the goods from sitting outside stock for days.
Troubleshooting
The message Insufficient available stock at source: 40 < 45.
- What is available at the source location (the first number) is less than the requested quantity. Part may be reserved or blocked. If the product has a lot, check the Lot ID: without it, the line with no lot is looked up.
The message Source and destination locations must differ.
- You picked the same location as source and destination. Change the destination.
“You do not have access to the destination warehouse.”
- Your user is not assigned to that warehouse. Ask an administrator (see Managing users).
The warehouse I want to send to does not appear.
- Only active warehouses other than the current one are listed.
I cannot see the transfer to receive it.
- Make sure you are in the destination warehouse. The inbox only shows transfers in transit to the active warehouse.
Receiving shows a message containing is not in transit.
- Someone already received it (for example, a double click). Reload the inbox.
Frequently asked questions
Where do I see transfers I already made?
The Transfers screen only shows the ones on their way to your warehouse. Completed ones, and those sent to another warehouse, are in each line history, where they show as Transfer movements with their code.
Can I cancel a transfer in transit?
There is no cancel button today. If it was sent by mistake, the destination warehouse must receive it and make a transfer back.
Where do I get the Lot ID?
Stock does not show it. Open the pencil (adjustment) of the line with the lot and cancel without saving: the page address in the browser includes lot_id= followed by the internal number. That is the number the transfer needs. See Lots, serial numbers and expiry.
Need help?
If something did not work as expected, our support team can help you.
Was this article helpful?