Documents, photos and the dock link
Overview
Every shipment carries its file: the documents the system generates (BOL, packing list and pick ticket), files attached to it (proof of delivery, signed BOL, photos), the photos the worker took while loading and the link to the dock job. It all lives on the shipment screen. Numbering and documents across the whole flow are summarized in Document numbers and documents across the flow.
Before you start
- To print, generate and attach: the documents module enabled for the warehouse and the Generate Documents permission (default: Admin, Supervisor and Worker).
- To choose the email photos and resend it: Ship (Close Shipments) (Admin and Supervisor).
- To link or unlink the dock job: the docks module and Create Shipments.
- To edit templates: the manage-documents permission (default: Admin).
Print documents
From Confirmed onwards, a Documents bar with the Print Documents button appears above the timeline.
- Click Print Documents. A list of available documents opens.
- Tick one or more: Print Pick Ticket, Print Packing List and Print BOL. The arrow icon next to each opens just that one.
- Click Print. Each document opens in its own tab, ready to print.
- BOL and packing list: if one was already generated, that one opens; no new version is created on each click. To reflect changes, use Regenerate.
- Pick ticket: always regenerated when printed. See The pick ticket.
- If the warehouse had no template of that type, the built-in one is created on print.
- If the customer restricts their documents, only the allowed ones appear.
- On close, the BOL and packing list are generated and stored automatically.
The documents panel
Further down the screen is the Documents panel. For each type it shows the Current one (template version, who generated it and when) with these buttons:
- View: opens it in a viewer within the page.
- Download: downloads the PDF.
- Regenerate: creates a new version with the current data. Previous ones stay in the history.
- Edit template: with permission, opens the document design.
Types not yet generated show a Generate PDF button. If there are several templates of the same type (a general one and the customer’s), you choose which. Template design is covered in Design a template.
Documents for a multi-customer shipment
On close, a BOL and a packing list are generated per customer, each with their lines and that customer’s template. Whatever you print from the menu before the close comes out as one document for the whole shipment. See Shipments for several customers.
Attach files
In the panel’s Attachments section you upload the shipment’s paperwork.
- Drag the file into the box or click to choose it. You can also paste a screenshot with Ctrl+V or the Paste button.
- Pick the type: POD, packing list, photo, signed BOL or other.
- Leave Send in notifications ticked if the file should travel in the customer email (it comes ticked), or untick it. It only travels if the customer has attaching documents to their notices turned on.
- Click Attach.
PDF and JPG or PNG images up to 10 MB are accepted. Each attachment shows who uploaded it; those the customer uploaded from their portal carry the Portal tag. To remove one, use Delete (it can’t be undone). In their portal the customer only sees the attachments they uploaded themselves.
Loading photos
Photos the worker takes during the pickup job appear in the panel as Loading photos. They aren’t copied: they are shown from the linked dock job.
- Each photo’s icon decides whether it is attached to the shipment-closed email. Selected ones carry the In email tag.
- The Photos in the notification selector decides for this shipment: follow the customer’s setting, send photos for this document or don’t.
- For a cross-dock, only the loading photos go in the email, not the unloading ones.
Resend the email to the customer
The shipment-closed email goes out on its own at close. If the customer asks again or you fixed something, use Send by Email in the documents bar (shipped shipments only). The system asks for confirmation and shows the date of the last notice (“Notified: …”) next to it.
If the customer has no contact with an email for that notice, or has the email channel off, a yellow notice appears and nothing is sent. See Customer emails and reports.
Link to the dock job
The shipment is tied to the truck through the pickup dock job. Normally the supervisor links it when assigning a dock on the Docks board; this card is for seeing and correcting it. Linking from the board is explained in Link a receipt or shipment to a dock job.
- Linked: the card shows driver, carrier, trailer, job status and the job and worker notes, with View full detail, the worker job details button and Unlink.
- Not linked: the card says so and offers up to 20 active pickup jobs in the warehouse, for the same customer or with no customer, with a Link button.
- When linking, the driver’s details (carrier, name, trailer, truck, plates, pickup number and seal) fill the shipment’s empty fields.
- Unlinking a shipment in Loading returns it to Reserved (the reservation stays).
- A shipped shipment can’t be unlinked.
- The card only offers pickup jobs. A load job created from the yard is linked from the dock board.
The loading verification checklist
It’s the list of things the worker checks before finishing a job: dock number, trailer number, piece count, damage, seal photo, doors closed… It is set per warehouse in Admin › Configuration, loading checklist card (needs Create Shipments).
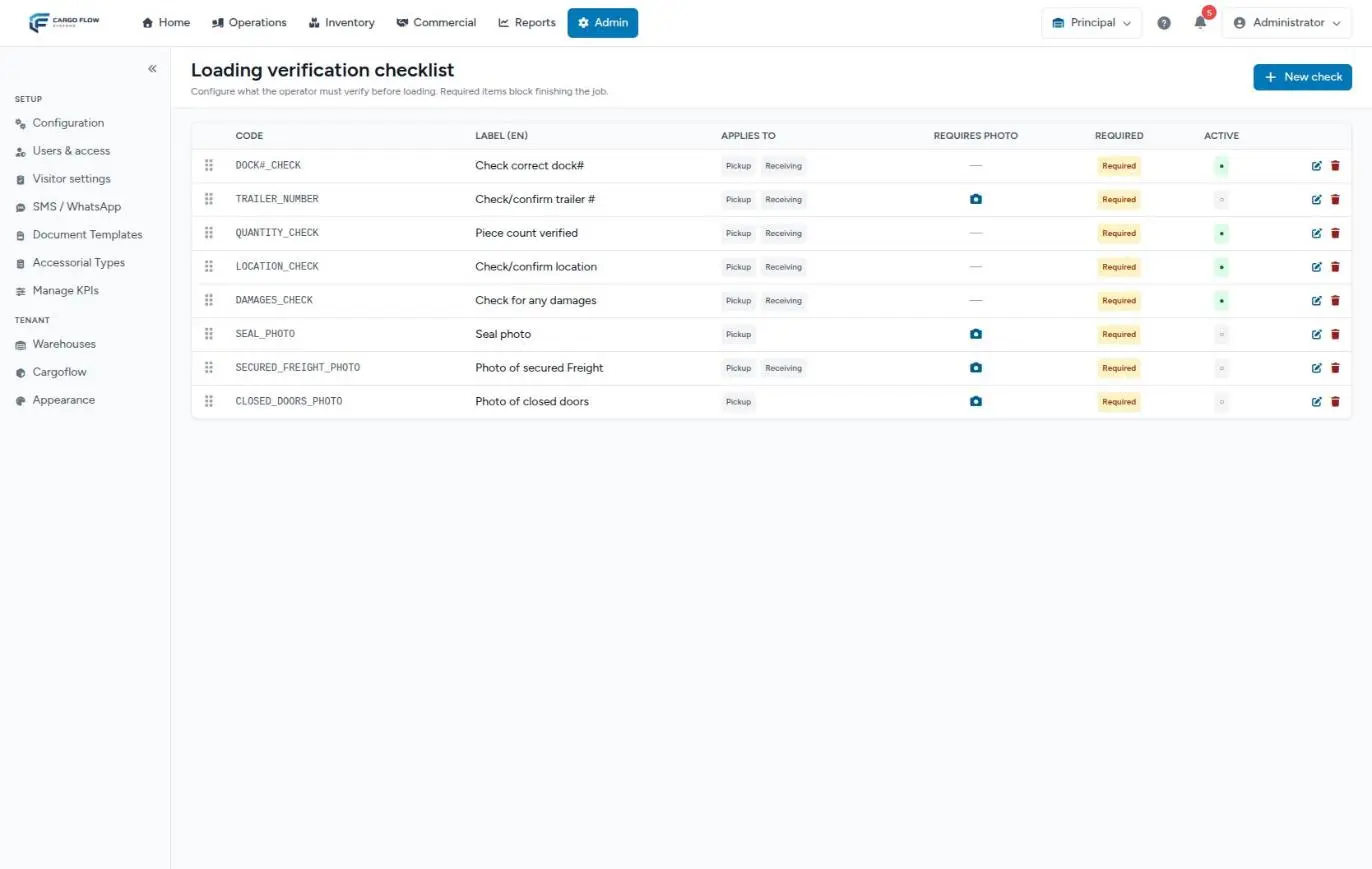
- Click New check.
- Enter the Code (lowercase, unique in the warehouse) and the labels in English and Spanish: the worker sees the one in their language.
- Under Applies to choose pickup, receiving or both. Empty applies to all.
- Tick Requires photo and the minimum number of photos if evidence is needed.
- Tick Required if the worker must not be able to finish without it.
- Save. Drag rows to change the order the worker sees them in.
- Required, active checks block finishing the dock job until they are ticked (with their photos).
- A check with captured results can’t be deleted: deactivate it.
- The pickup part only works with the shipping module; the receiving part, with the receiving module.
- It doesn’t apply to cross-dock jobs.
Example
Valley Distributors asks for the signed proof of delivery. The next day the carrier emails it; Ana López drags it into the panel, picks POD, leaves send in notifications ticked and clicks Send by Email: the customer gets the shipment-closed notice again, now with the proof attached, because they have documents in their notices turned on.
Troubleshooting
The documents bar doesn’t show.
- The shipment is Draft or Cancelled, the warehouse lacks the documents module, or your user can’t generate documents.
The worker can’t finish the job.
- A required check or its photos are missing. Their console shows what’s missing.
The list of jobs to link is empty.
- There are no active pickup jobs for the same customer or with no customer. Check on the board that the job exists and isn’t finished or cancelled.
When linking, a message says the shipment is already linked to another job.
- Unlink it from the other job first.
The file won’t attach.
- Only PDF, JPG or PNG up to 10 MB.
FAQ
The printed BOL doesn’t have the seal I entered
Printing reuses the current document, generated before your change. Click Regenerate in the documents panel.
The packing list doesn’t show in the menu
Either the customer restricts their documents and it isn’t included, or the warehouse lacks the documents module. Check the customer record and the templates in Manage templates.
Can the documents come out in Spanish?
The built-in BOL, packing list and pick ticket templates have English headings. Translate them once in the warehouse’s template builder, or create a Spanish template for the customer who needs it.
Need help?
If something did not work as expected, our support team can help you.
Was this article helpful?