Designing a document template
Summary
Documents are designed with a visual editor. You place elements on the page, tell each one which data it takes, and the system fills them in every time it generates the document. No programming needed.
For the list, per-customer templates and which one is used in each case, read Managing document templates first. The full list of data for each type is in The data available in each document.
Creating the template
You need the Manage Document Templates permission (by default, admins).
- In Document Templates, tap Create template. The fastest way is usually to Duplicate a similar one and adjust it.
- Give it a name (required, up to 120 characters) and choose the document type. The type decides which data you will have available.
- Customer: leave it empty for a global template, or choose one so this one wins over the global one for that customer only. If you came from the customer profile, it is already selected.
- Leave Active checked if you want it used as soon as you save it.
- Set up the page (see below).
- Save: "Template created" appears and you land straight in the editor.
The page fields
| Field | Accepts |
|---|---|
| Page preset | Letter, letter landscape, A4, A4 landscape, 4×6, 4×2 or 2×1 inch labels, or a custom size. Sheets come with half-inch margins (12 mm on A4); labels, with none. |
| Width and Height | Required, at least 0.5 of the chosen unit. |
| Unit | Inches, millimeters, centimeters or points. |
| Orientation | Portrait or landscape. |
| Margins | Top, right, bottom and left. Empty counts as zero. |
| Flow body (paginate tables) | Turn it on for full sheets like the goods received note: the header comes out only on the first page, the table continues on the next ones and the footer comes out at the end, right under the last row. Turn it off for labels, where everything sits in fixed positions. |
The editor
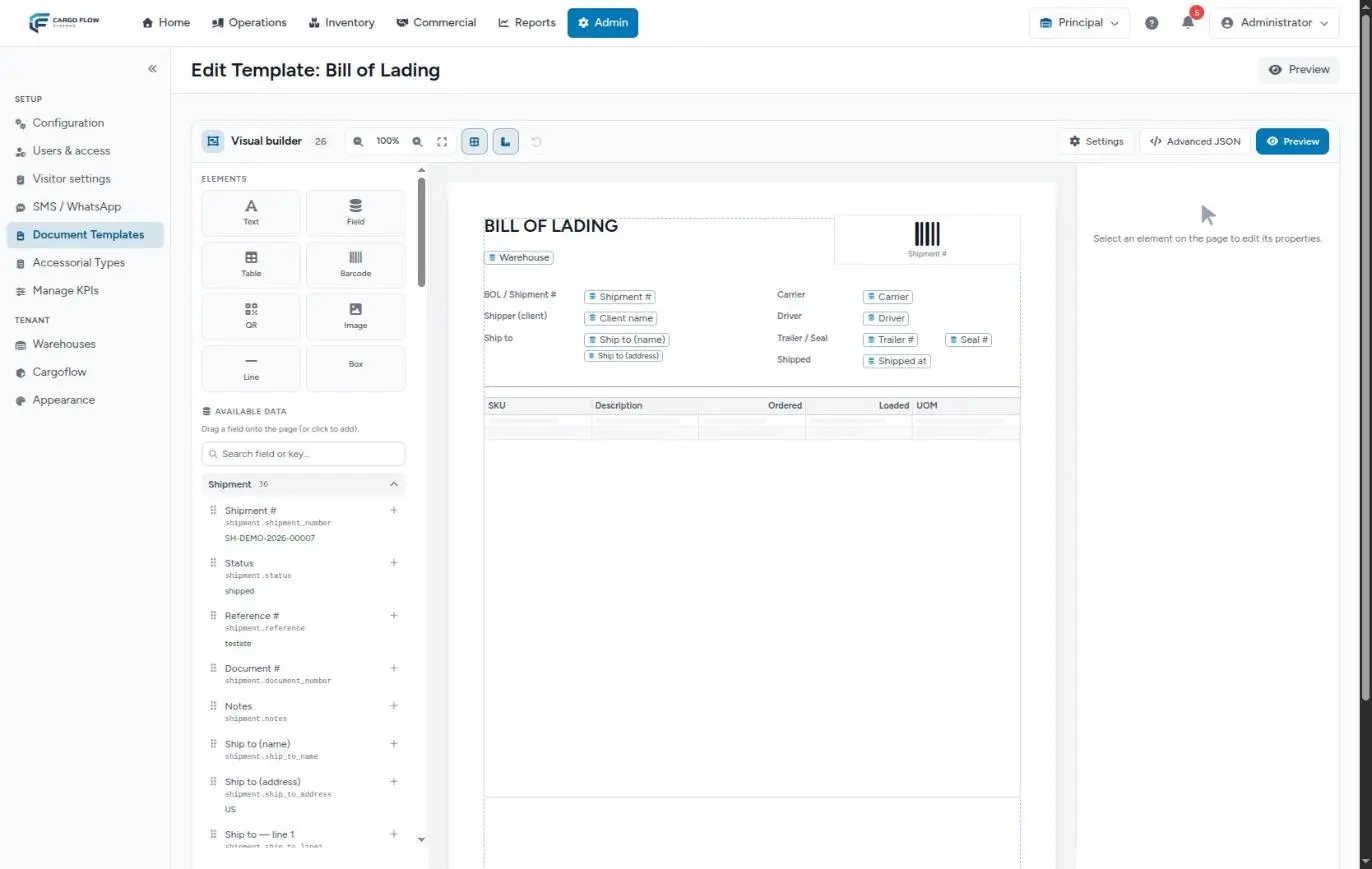
It has a toolbar at the top and three areas:
- Toolbar — zoom (with Fit to width), Snap to grid, Margin guides and Undo; on the right, Settings (name, type, customer, active and page), Advanced JSON and Preview. The number next to "Visual builder" is how many elements the page has.
- Left — elements and data. At the top, what you can place on the page. Below, Available data: every field of the document type, grouped and searchable (by name or by key), each with a sample value taken from the latest real document. That value is exactly what will print. Drag a field onto the page or tap + to add it.
- Center — the page. Elements move with the mouse or the arrow keys. Double-click a text to edit it in place.
- Right — the properties of the selected element. With nothing selected it reads "Select an element on the page to edit its properties".
Keyboard shortcuts
| Key | What it does |
|---|---|
| Arrows | Move the element; with Shift, ten steps at a time. |
| Delete | Removes the element. |
| Ctrl+D | Duplicates it. |
| Ctrl+Z | Undo. |
Elements and their properties
Every element has Position / size (X, Y, width and height in the page unit) and, when selected, Duplicate, Delete and Bring to front.
| Element | What for | Own properties |
|---|---|---|
| Text | Fixed text: titles, notes, clauses. | The text; style (size 5 to 72 points, bold, alignment, color, background). |
| Field | A piece of document data: number, customer, date, driver, trailer, seal… | Database field, format, "if empty" and style. |
| Table | The document rows (products, lots, charges, what was entered in the receiving record). | Source, columns, header, zebra, total pieces. |
| Barcode and QR | One or more pieces of data encoded for scanning. | Encoding, symbology and combined fields. |
| Image | Warehouse logo, customer logo or an image of its own. | Image source. |
| Line and Box | Separators and frames. | Thickness (points), color and, for the box, background. |
Fields: format and "if empty"
- Format — for dates: short date (10/07/2026, month/day/year), long date (October 7, 2026), date and time (10/07/2026 09:30 AM) or time (09:30 AM). Without a format, the date comes out as the system stores it. Only these formats are accepted.
- If empty — what prints when the data was not entered: a dash, "N/A", "No seal". Without it, the gap stays blank.
Tables and totals
When you place a table you choose its Table source: on a receipt, the lines; on a shipment, the lines or the rows by lot; on an invoice, the charges; on the receiving record, the entered items or the inspection list. Changing the source replaces the columns with those of the new one.
For each column you set the header, the width, the alignment and, if you like, an aggregate calculated at the bottom: sum, average, row count, minimum or maximum, with decimals, thousands separator, and a prefix and suffix of up to four characters (for example "$" or " lb").
- Header — shows the title row.
- Zebra — shades every other row.
- Total PCS — adds a final row with the sum of pieces across all lines.
If the customer has their own per-line fields (part number, work order, date code), they appear as available columns in the receipt lines table.
Barcodes and QR codes
- Symbology (barcode only): Code 128, Code 39, EAN-13 or GS1-128. Code 39 only accepts capital letters and digits.
- Encoding: Delimited text (label:value separated by "|"), JSON, URL / link or GS1. JSON and URL only fit in a QR code.
- Combined fields: with Add field you put several pieces of data into one code, each with an optional label, or a fixed value.
- GS1: each piece of data carries its application identifier. Allowed: 00 (SSCC), 01 (GTIN), 10 (lot), 11 (production date), 17 (expiration), 21 (serial), 30 (variable count), 37 (unit count), 400 (customer purchase order) and 420 (ship-to postal code).
Images
In Image source you choose Warehouse logo, Client logo or Uploaded image, and with Upload image you load the file (JPG, PNG, GIF, WEBP or SVG, under 4 MB). Where each logo lives is covered in Logos and per-customer templates.
Example: a 4×6 pallet label
- Create a template "Pallet label — Northern Trading Co.", type pallet label, customer Northern Trading Co., preset 4×6 label, flow body off.
- At the top, an image with Client logo.
- A large field with the line SKU and another with the product name.
- A field with the piece number and another with the total pieces, separated by a text "of": it will print "3 of 12".
- A Code 128 barcode with the pallet id (the receipt number plus the line number, for example REC-NT-00058-1).
- Preview. If the sample line has 12 pallets, printing "per pallet" produces 12 labels.
Preview
The editor's Preview button draws the design as it is on screen, without saving it, against the latest real document of that type in the warehouse. It is how you find out whether a long name overflows or the table breaks well onto the second page before printing a hundred labels. The draft preview runs the same checks as saving.
Saving and versions
When you save changes to an existing template, "Template updated" appears and you go back to the list (not the editor). Every time you save a change to the design or the page, the template version goes up, and every PDF issued records which version it came out with. So months later you can tell why an old document looks different from today's. Changing only the name, customer or status does not bump the version.
For advanced users, Advanced JSON shows the design as text, which can be copied into another template and applied with Apply JSON. On save, the system checks every element and rejects fields, formats, tables, images or GS1 identifiers that do not exist for that type.
When they are printed
- Automatic: the goods received note when a receipt is confirmed (and again if that receipt is edited); the bill of lading and packing list when a shipment is closed.
- On request: from the receipt or the shipment, with Print documents. You pick one or more and each opens in its own tab, ready to print. From the Documents panel you can also generate with a specific template, view, download and regenerate.
See Receipt photos and documents and Shipment documents.
Troubleshooting
"Element 4 uses a field "…" that is not allowed."
- The design uses a field that does not exist for this document type (it happens when you change the type of a template already designed, or paste JSON from another one). The number is the element's position, counting from 0. Remove that element or pick another field.
"Invalid JSON: it must be a list of elements."
- The text pasted into Advanced JSON is not a list. Copy the whole design of the other template, from the first bracket to the last.
"Save the template first to upload its own images."
- The new template does not exist yet. Save it once and upload the image again.
"Upload failed. Use an image under 4 MB."
- The image is larger than 4 MB or not an accepted type. Shrink it or convert it to PNG or JPG.
A field comes out empty in the PDF.
- That data was not entered on the document. Use If empty to print replacement text.
The last table row overlaps the footer.
- Turn on Flow body and leave space between the table and the footer; the table moves to the next page instead of overlapping.
Frequently asked questions
I do not see the button to print a certain document
It is almost always configuration, not a fault: either that type is not in Documents this client uses on the customer profile, or your user lacks the generate-documents permission, or the receipt is not confirmed yet (the receipt's quick print buttons appear on confirmation). The button is hidden instead of appearing and failing.
I printed again and it came out the same as before
That is on purpose: printing reuses the current document instead of generating a new one each time, so the history does not fill with identical copies. If you want a new one, use Regenerate. The pick ticket is the exception: it is always rebuilt, because it reflects the current state.
Can I use a customer's own fields?
Yes. The fields entered per line when receiving a customer's goods (defined on their profile) appear in the editor's available data and can be used as columns in the receipt lines table.
Need help?
If something did not work as expected, our support team can help you.
Was this article helpful?