Create a shipment
Overview
The shipment form captures the customer’s outbound notice: when, under what reference, with which carrier, where to and which products. You can save it as a draft (to fill in as you go) or save and confirm in one step, which also notifies the warehouse and tries to reserve the stock.
Shipments the customer sends through the portal, EDI or API appear in the list on their own; this form is for entering them by hand. The full path is in How shipping works.
Before you start
- Create Shipments permission (default: Admin and Supervisor) and the shipping module enabled for the warehouse.
- The customer exists in the warehouse and isn’t deactivated.
- The products exist in the catalog, either the customer’s or general ones. If a product is new, create it first: see Products and units.
- For the reservation to work, the stock has already come in through a confirmed receipt. If it hasn’t arrived yet, you can still enter and confirm: it gets reserved later.
Open the form
Go to Inventory › Shipments and click Create Shipment at the top right.
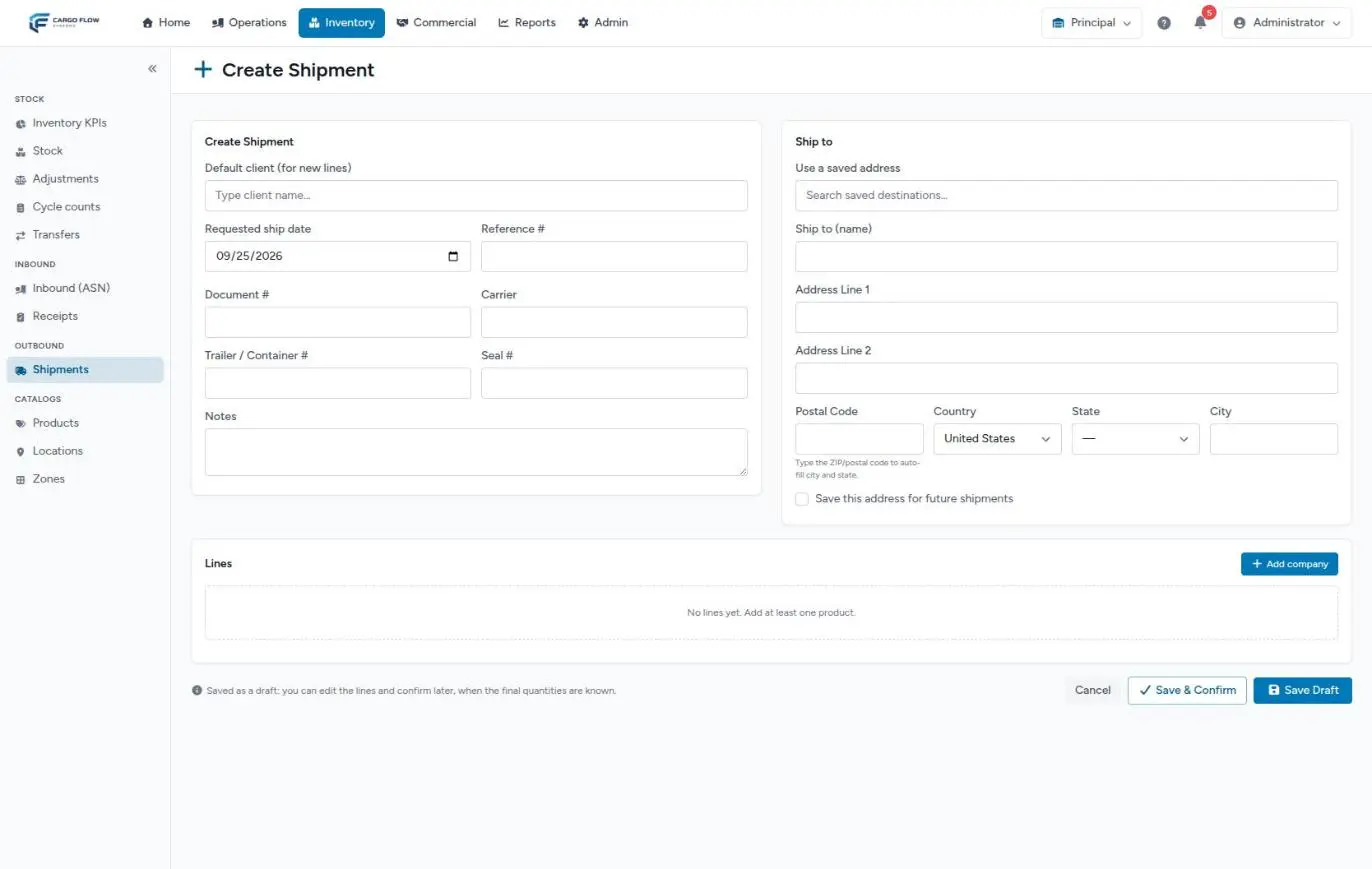
Header details
| Field | What it’s for | Required? |
|---|---|---|
| Default client (for new lines) | The customer proposed for the first group of lines. Type part of the name to search. | Only when saving a draft with no lines, because the shipment number comes from it. |
| Requested ship date | When the customer wants it to leave. Defaults to today in the warehouse’s time zone. It is the date the on-time KPIs and the late-shipments alert measure against. | To confirm. A draft can have no date. |
| Reference # | The customer’s order number (up to 64 characters). It appears on every document and on the invoice, and it is what the customer searches for. If another non-cancelled shipment already uses it, a notice shows its number, status and customer with a link; you can carry on. | No |
| Document # | The shipment paperwork number, e.g. the carrier’s BOL number (up to 128). Different from the customer reference. | No |
| Carrier | The trucking company picking up. If left blank, it is filled with the one the driver registered when the truck gets linked. | No |
| Trailer / Container # | The planned trailer. If the driver registers a different one on arrival, the shipment screen shows a trailer mismatch notice. | No |
| Seal # | If already known. Usually the worker enters it when loading or the supervisor when closing. | No |
| Notes | Free-form instructions (up to 2,000 characters). Shown on the shipment screen and printed on the pick ticket and packing list. | No |
Ship to: the destination
- If the destination was used before, type in Use a saved address and pick one: every field fills in.
- If it’s new, fill in Ship to (name), Address Line 1 and, if needed, Address Line 2.
- Type the Postal Code with the right Country (United States by default): city and state fill in when the code is recognized.
- Tick Save this address for future shipments if the destination will repeat.
The whole destination is optional. The address book, its limits and how it prints on the BOL are covered in Ship-to addresses and the address book.
The lines
Lines are grouped by customer (the screen says “company”). A shipment can carry stock for several customers; read Shipments for several customers before doing that.
- Click Add company. The first group takes the default client; later ones start empty so you pick the Client.
- Click Add product and type part of the SKU or name. The list only shows that customer’s products and general ones, with their available quantity.
- Enter the quantity under Ordered (greater than zero) and check the UOM, proposed from the catalog.
- Under each product you’ll see how much is Available, which locations hold it, and the catalog dimensions, weight and volume. If you order more than is available, “Exceeds available stock” appears; it is informational only.
- To remove a line, use the trash icon on its right.
Above the lines you see how many there are and the total ordered quantity.
The product search
The magnifier button next to the product field opens a fuller search window:
- Search by SKU, name, receipt number or the reference of the receipt the stock came in on. That way you can build the shipment from “what came in on that receipt”.
- Results are grouped by customer. Tick several, adjust each quantity and click Add selected (or the add button of each group).
- Products with no stock are hidden by default; Show out of stock reveals them.
- If a product shows a reserved quantity, it is already set aside for another open shipment: it is in the warehouse, but less is available.
The unit of measure
The UOM field takes up to 16 characters and is required on every line. It defaults to the product’s catalog unit.
Save draft or save and confirm
| Button | What it does | What it requires |
|---|---|---|
| Save Draft | Saves as Draft. Reserves nothing and notifies nobody. Useful for early visibility when quantities aren’t final. | A customer (default or on the lines). Lines and date can be missing. |
| Save & Confirm | Saves as Confirmed, sends a bell notice to the warehouse’s configured roles and tries to reserve the stock straight away (partially if needed). | Requested ship date and at least one line. |
| Cancel | Goes back to the list without saving. | — |
Pressing Enter inside the form saves a draft; it never confirms by accident. Either button lands you on the new shipment’s screen.
What happens after saving
If you confirmed, the automatic reservation has three possible outcomes:
- Everything was there: it becomes Reserved and each line shows its allocated quantity.
- Some was there: what exists is reserved and it also becomes Reserved; the gap shows in the allocated column.
- Nothing was there: it stays Confirmed with a yellow notice saying it was confirmed but stock couldn’t be reserved, and why. Normal when the customer notifies before their goods arrive.
If you ticked it, the address is also added to the book; and the customer already sees the shipment in their portal. If you saved a draft, click Confirm Shipment when ready: it does the same as Save & Confirm.
Example
Valley Distributors emails asking to ship on Friday 40 eaches of SKU VD-330 and 6 of VD-118, reference VD-7781, to their customer in Monterrey.
- Under Default client you pick Valley Distributors; date: Friday; reference
VD-7781; carrier “Test Carrier”. - In the destination you type the name, the street and postal code
64000with country Mexico: city and state fill in. You tick save address. - You add a company, then both products with 40 and 6. Under
VD-118it reads “Available: 4 · Exceeds available stock”. - You click Save & Confirm. 40 of
VD-330and 4 ofVD-118are reserved: the shipment is Reserved, with 2 pending that get completed when the rest arrives (see Edit a confirmed or reserved shipment).
Editing a shipment already entered
- Draft: Edit button. Change anything, even the customers of the lines, and confirm from there too.
- Confirmed or Reserved: Edit, with a required reason: it releases, applies and reserves again. See Edit a confirmed or reserved shipment.
- Loading or Shipped: lines can’t be touched any more. Edit details only changes header data. See Cancel, release the reservation or roll back a shipment.
Error messages
“Select a default client to save the draft. You can add the lines later.”
- You saved a draft with no lines and no default client. Pick the customer in the first field.
“The Requested ship date field is required.”
- You clicked Save & Confirm with no date. Enter it or save as a draft.
“The Lines field is required.” or “Add at least one line before confirming the shipment.”
- Confirming needs at least one product.
“This product is already a line for this company.”
- You repeated a product for the same customer. Keep one line with the combined quantity.
“This product does not belong to the receipt client.”
- Although it says receipt, on a shipment it means the product belongs to a different customer than the line group. Change the group’s customer or pick the right product.
A customer field turns red in a line group.
- Each group needs its customer. Pick it or remove the group.
The product I’m looking for doesn’t show.
- The search only shows the group customer’s products and general ones. Check the group’s customer, or use the magnifier with Show out of stock if it has nothing available. If it’s new, create it first.
Best practices
- Always enter the customer reference, and always the same way: it is the key they will search by.
- Save the day’s shipments as drafts as soon as the notice arrives, even without final quantities; confirm when they are firm.
- Use the address book for repeat destinations: it avoids typos on the BOL.
- Enter quantities in the product’s base unit.
- If the customer sent a file with the order, attach it in the documents panel of the new shipment.
FAQ
Can I save a shipment with no lines?
Yes, as a draft with a default client. Handy for logging the day’s shipments early with their reference and adding products when the customer confirms quantities. It can’t be confirmed without lines.
What if I repeat a reference?
The form warns you as you type (case-insensitive, ignoring cancelled ones) and lets you carry on: sometimes customers reuse numbers. The system shipment number is always unique.
Can I order more than is available?
Yes. The notice is informational. On confirm, what exists is reserved and the rest stays pending; you’ll see it as a partial reservation.
Can I enter a shipment with a past date?
Yes, the form accepts it. Keep in mind that, until it ships, the daily alert will count it as late and the on-time KPI will measure it against that date.
Need help?
If something did not work as expected, our support team can help you.
Was this article helpful?