Set up a SKU step by step
This guide walks through setting up a SKU from start to finish, with the screen as it looks today. For what each field does in detail, see Products and packaging levels; here is the order in which to fill them in and what to check at each step.
Before you start
- Permission: Manage Inventory Catalogs (admin and superadmin by default).
- The right warehouse: each warehouse has its own catalog. Check in the top-bar picker that you are in the warehouse where the goods will live.
- The customer: must be created in this warehouse or attached to it on the Warehouses tab of its record. See Attach a customer to warehouses.
- The product data at hand: the SKU exactly as it appears on the customer’s notice or packing list, and the weight and dimensions of the piece, the case and the pallet. If you do not have all of them, you can save with what you have and finish later.
The words on the screen
Every customer has its own name for the same thing. This is how they map to the three levels on the screen:
| If the customer says… | In Cargoflow it is… | What it represents |
|---|---|---|
| Each, unit, piece, EA | Piece | The smallest unit you count. All inventory is kept in pieces. |
| Case, carton, inner, master carton, packaging unit | Standard pack | The box it arrives and ships in, with a fixed number of pieces. |
| Pallet, skid, handling unit, HU | Pallet | How it is stacked, racked and charged for storage. |
Step 0: decide what the piece is
This is the decision that matters most, and it is best made before opening the screen. The piece is the smallest unit you will count when receiving and shipping:
- If you ever open the case and ship loose pieces, the piece is the item (the bottle, the filter, the can) and the case goes in Standard pack.
- If the case is never opened (a bag, a pail, a box of powder coating that always ships whole), the piece is the case. In that case leave the standard pack off: the pallet holds pieces directly.
Step 1: open Products
- Go to Inventory › Products (Catalogs group in the side menu).
- Optional: filter by the customer to see which SKUs it already has and avoid a duplicate.
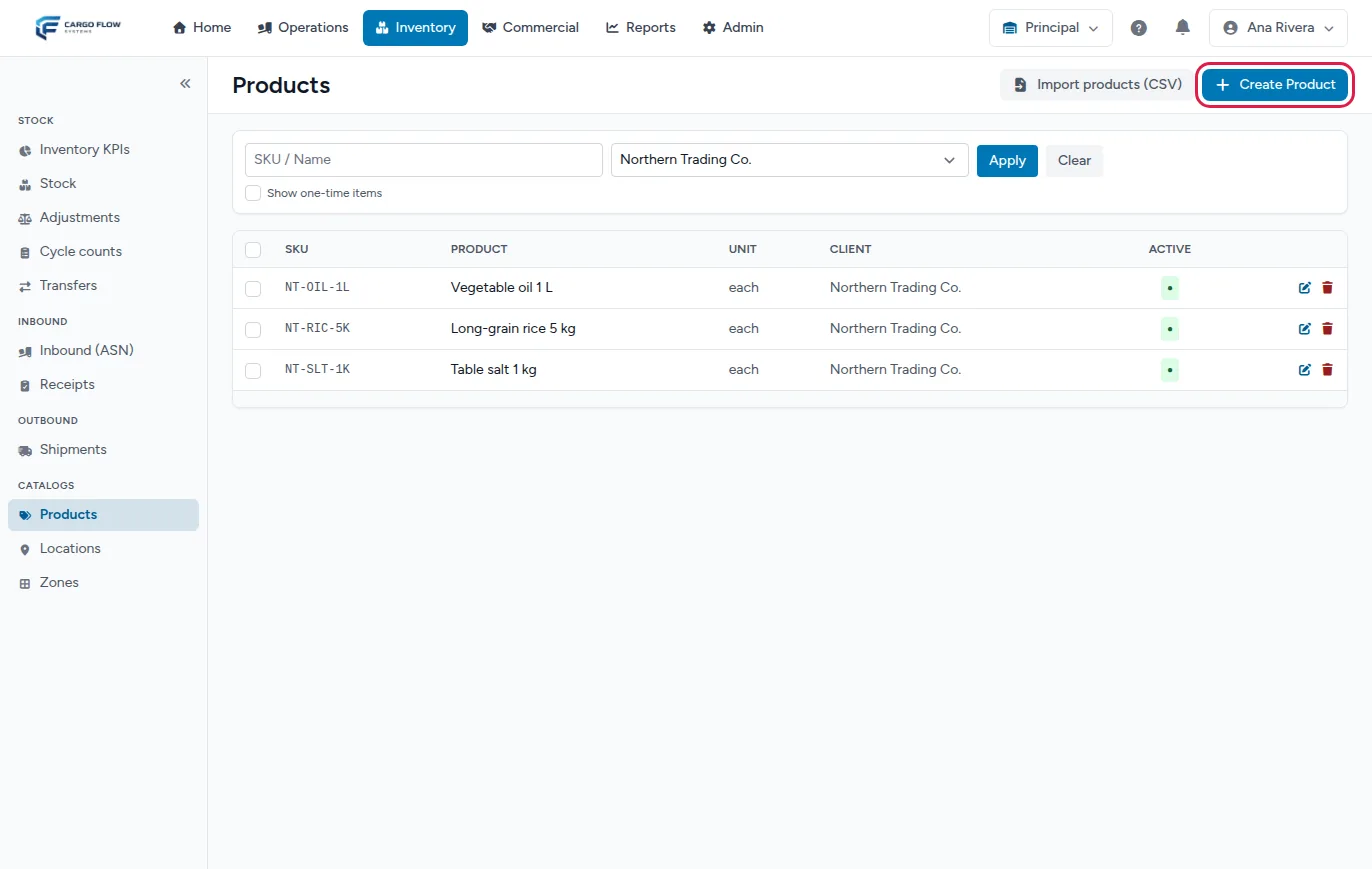
- Click Create Product, top right.
Step 2: general data
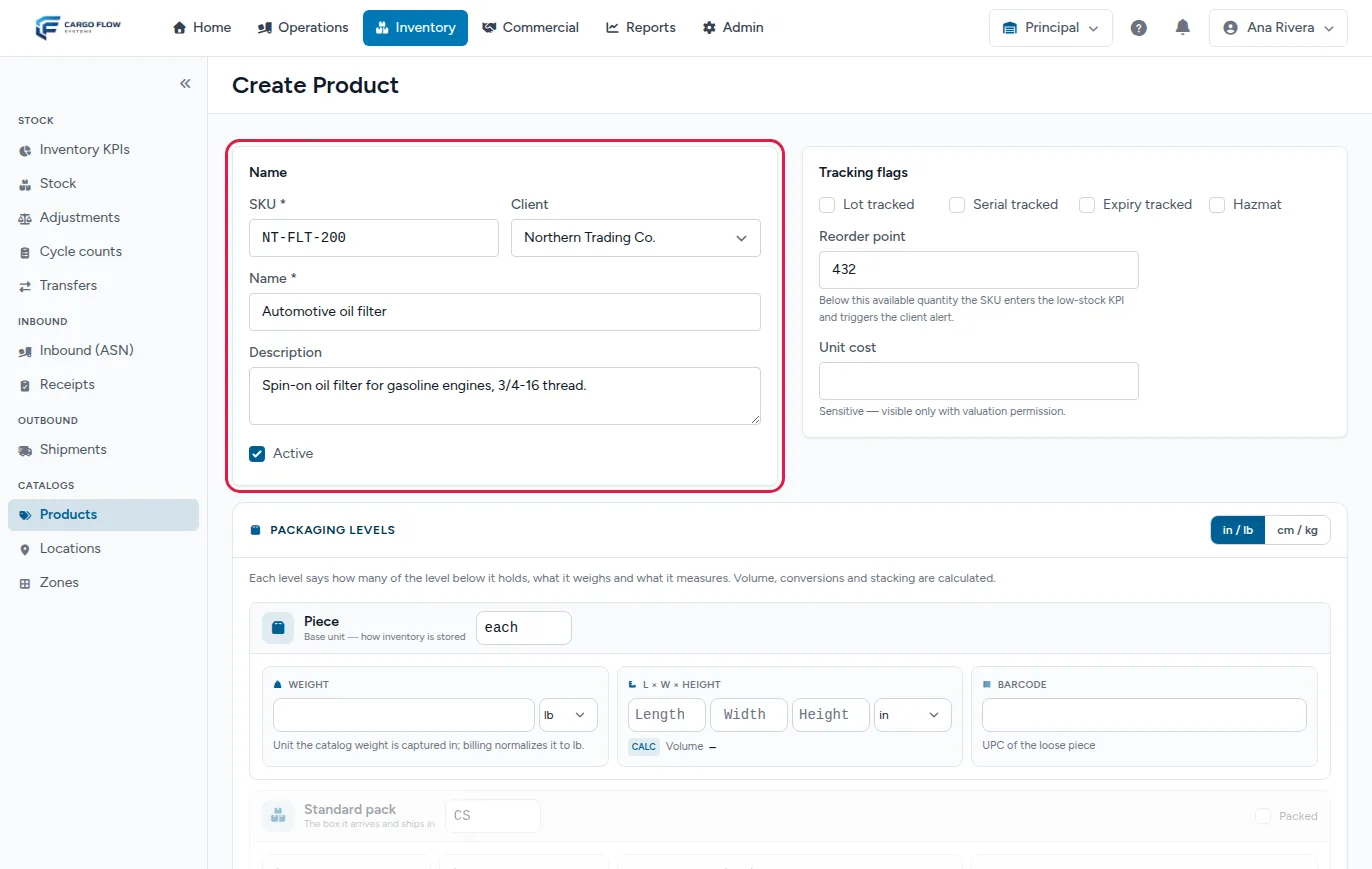
- SKU — type it exactly as it appears on the customer’s documents (arrival notice, packing list, order). That is how the search finds it when the goods arrive.
- Client — the owner of the goods. Leave Global only if the product belongs to the warehouse and every customer uses it.
- Name and Description — what the operator reads at the dock and what prints on documents. A name that makes sense without the SKU prevents capture mistakes.
- Active — leave it ticked.
- On the right, Lot tracked only if the customer tracks lots (the receipt will require it line by line) and Reorder point in pieces if you want the low-stock alert. See Lots, serial numbers and expiry.
Step 3: the piece
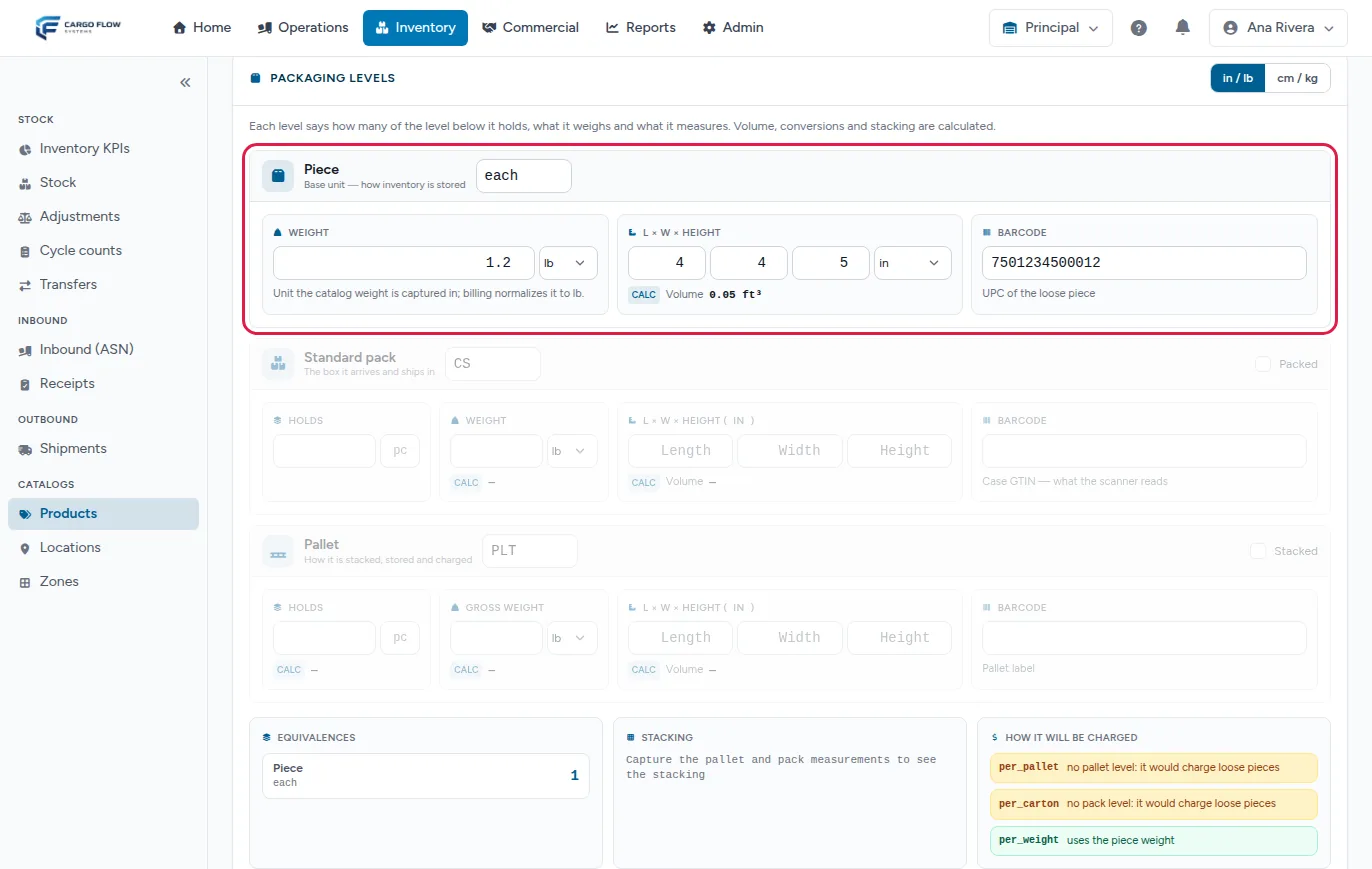
- Pick the unit system with the in / lb or cm / kg switch in the corner. Every level is captured in the same one.
- Code — the base unit.
eachworks for almost everything; use another (BOX,BAG) only when the piece is a case or a bag (see step 0). - Weight — of one piece. Weight-based charges use it: without it, they come out as zero.
- Length × Width × Height — of one piece. With all three, the calculated volume appears.
- Barcode — the UPC of the loose piece, if it has one.
Step 4: the standard pack
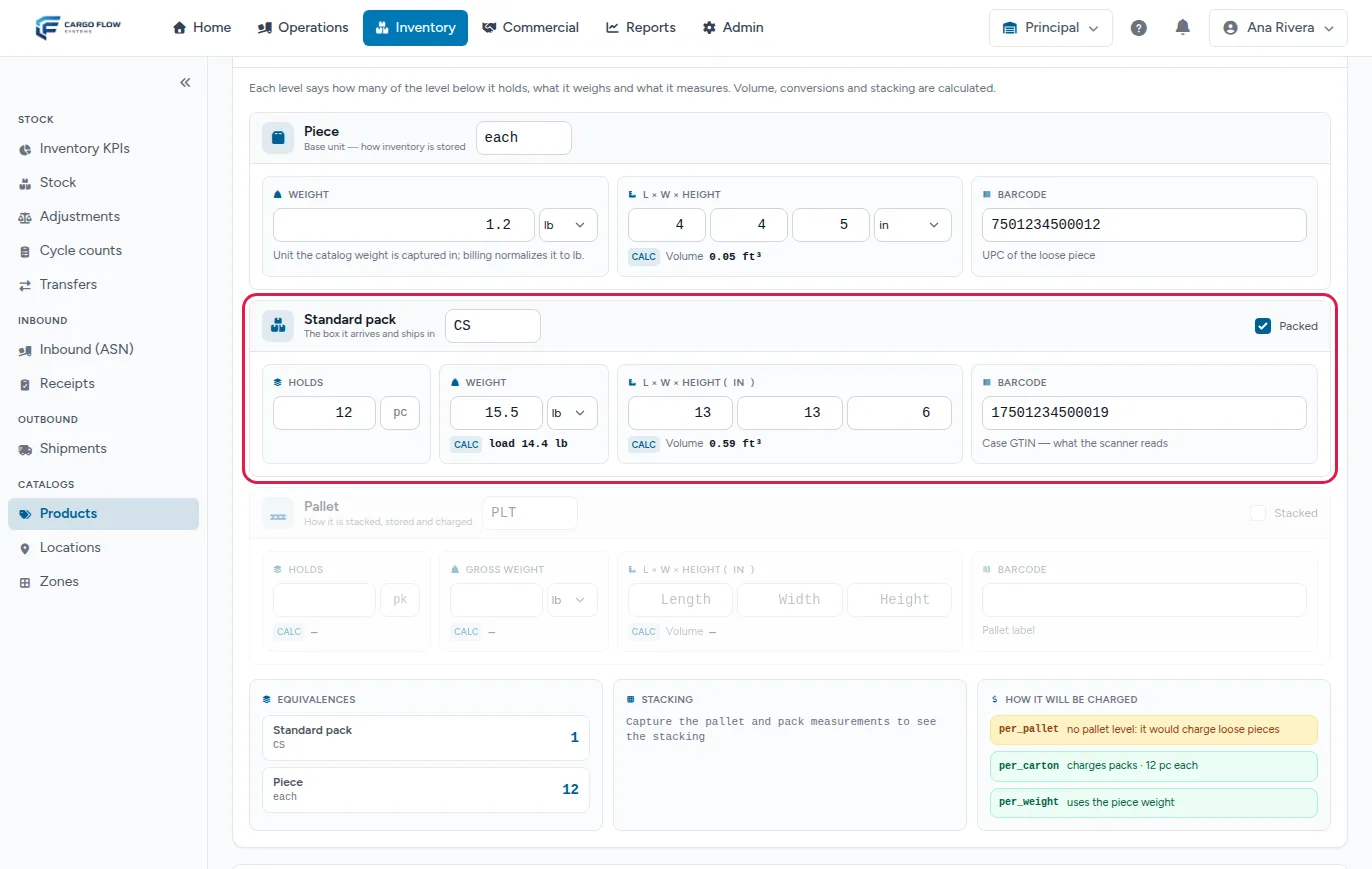
- Tick Packed (on the right). While the level is off, anything typed in it is discarded on save.
- Code — defaults to
CS; keep it or use the customer’s (CASE,MASTER). - Holds — how many pieces one case contains. A whole number.
- Weight — of the full case, cardboard included. Below it you see the load: the weight of the pieces inside. If your weight is lower than the load, check one of the two.
- Dimensions — of the closed case. The stacking calculation in the next step uses them.
- Barcode — the case GTIN. It is what the scanner reads when the operator scans cases.
Step 5: the pallet
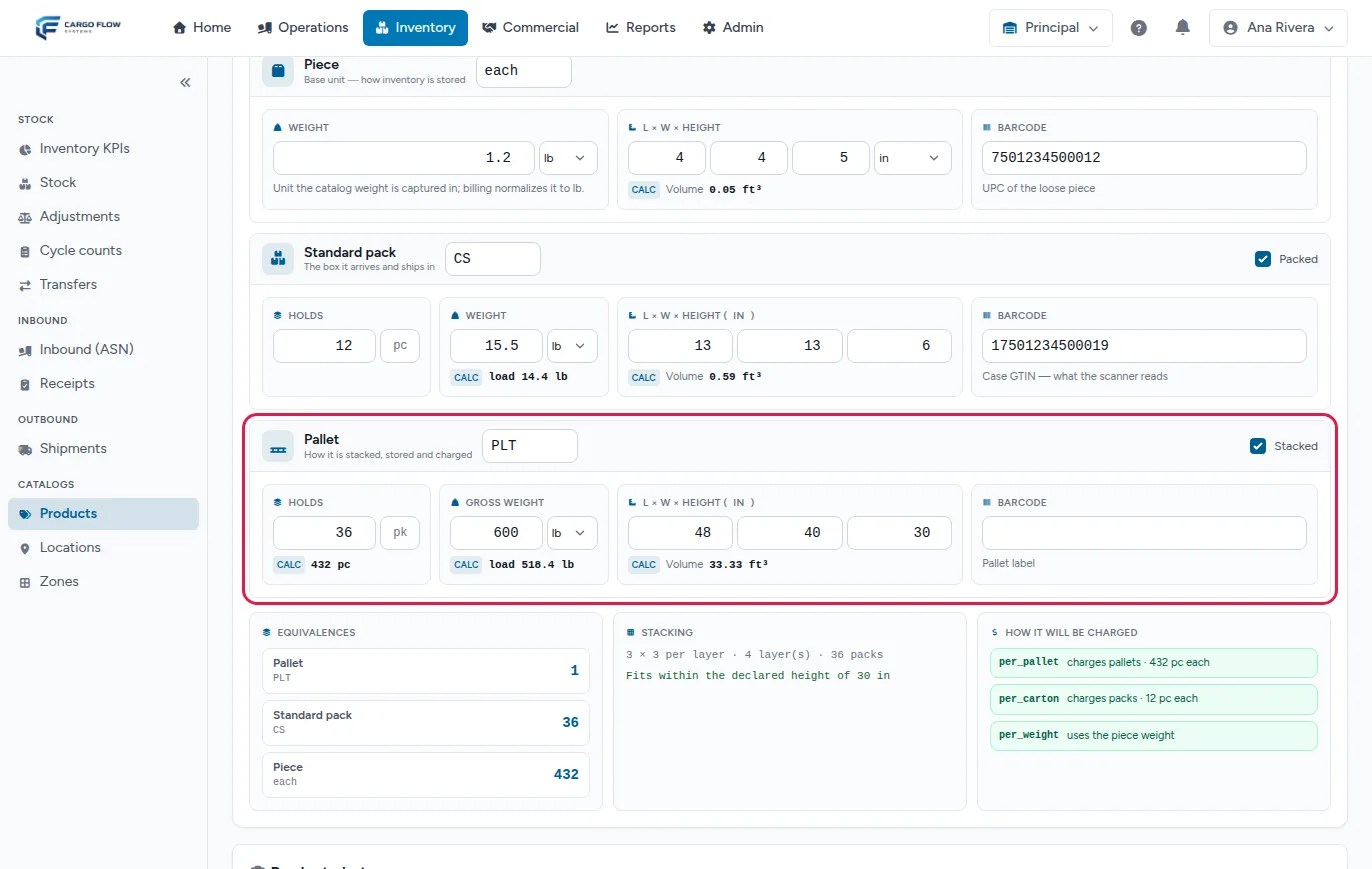
- Tick Stacked.
- Code — defaults to
PLT; you can keep it. - Holds — how many packs a full pallet carries (or how many pieces, if the pack is off). Type “36 cases”, not “432 pieces”: the system does the multiplication and shows it below.
- Gross weight — the whole pallet, wood and stretch wrap included.
- Dimensions — of the built pallet. The height includes the wooden deck (about 5.5 inches); the system subtracts it to work out how many layers fit.
- Barcode — if the pallet carries its own label.
Step 6: check what the system calculates
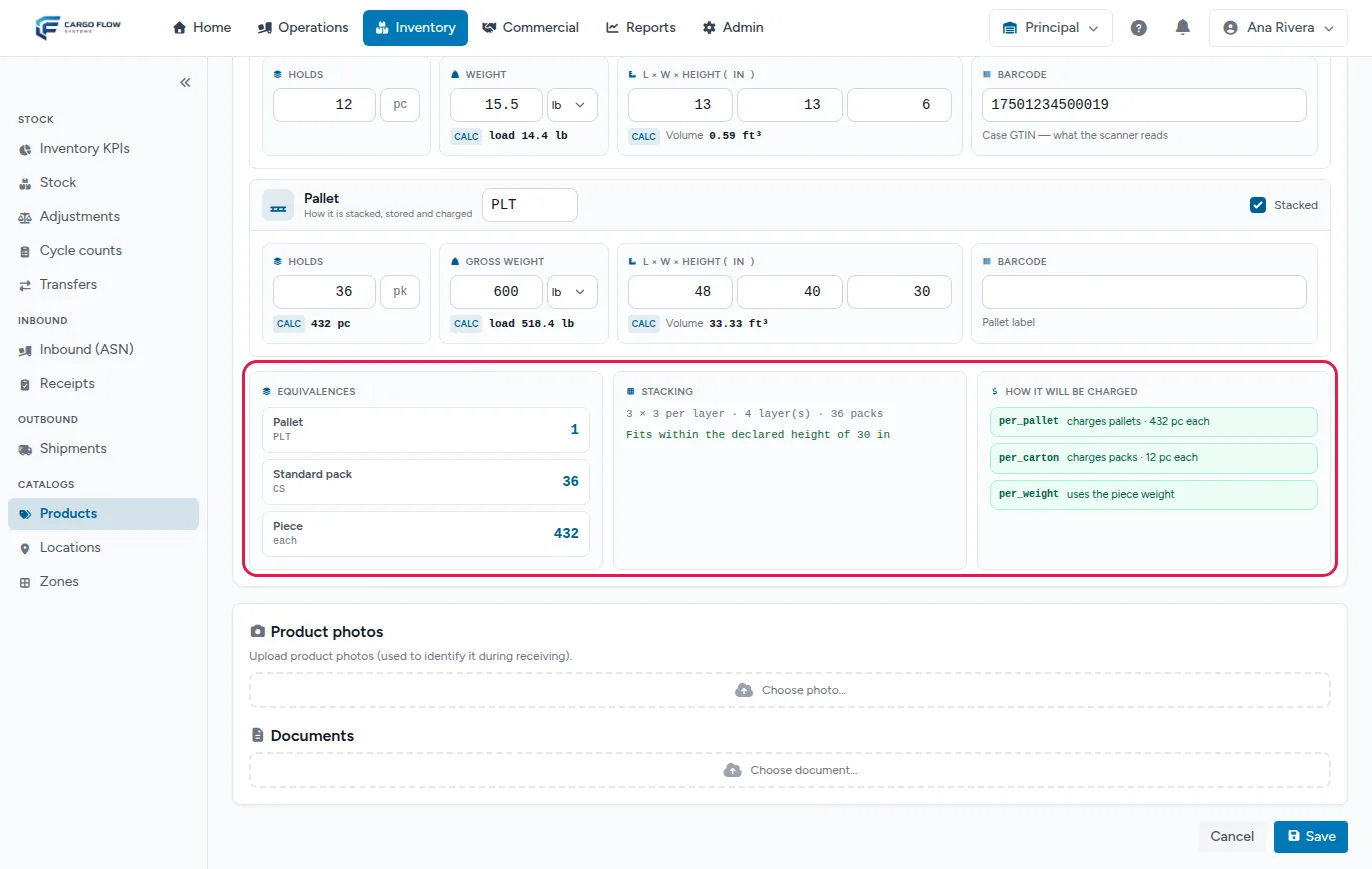
- Equivalences — how many pieces each level holds. Compare it with what the customer says: “1 pallet = 432 pieces”.
- Stacking — how many cases fit per layer, how many layers, and whether they fit in the height you entered. If it says it does not fit or that the count does not fill whole layers, check the dimensions or the count before saving: fixing it here is cheaper than in front of the rack.
- How it will be charged — everything should be green. Yellow tells you what is missing: without a pallet it would charge loose pieces, without a pack the same, and without a weight the weight-based charges come out as zero.
Step 7: save
- If you like, attach photos (they help identify it when receiving) and documents (spec sheet, safety data sheet) at the bottom of the form.
- Click Save, bottom right.
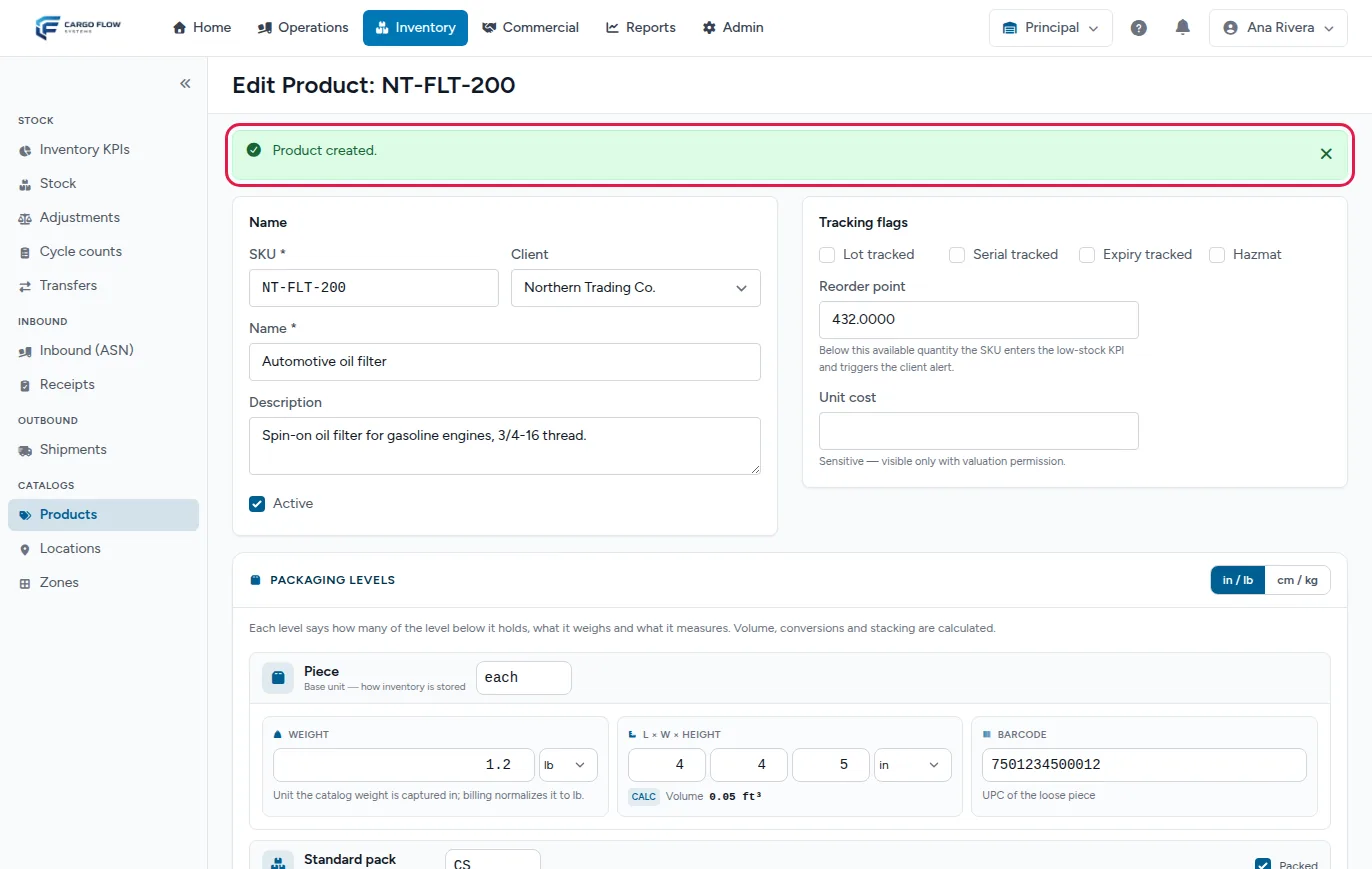
- The system leaves you on the edit screen of the new product with the “Product created.” notice. Check that the equivalences came out as you expected.
Three common setups
| Case | Piece | Standard pack | Pallet |
|---|---|---|---|
| Pieces in cases, cases on a pallet (this guide’s example) | each, 1.2 lb | On, 12 pieces | On, 36 packs |
| A closed case that is never opened (powder coating, bags, pails) | BOX, the weight of the full case | Off | On, 40 pieces (cases) |
| Loose goods that are not palletized | each | Off | Off: per-pallet storage would charge each piece |
If the customer operates in two warehouses
The customer is one and the same, but each warehouse has its own catalog. A SKU set up in one warehouse does not exist in the other:
- Check that the customer is attached and active in the second warehouse (Warehouses tab of its record). Otherwise it does not show in the Client picker, or the system rejects it on save.
- Switch to the second warehouse with the top-bar picker.
- Set up there the SKUs that will arrive at that warehouse, with the same SKU and the same packaging.
Checklist
- I am in the right warehouse.
- The SKU is typed exactly as on the customer’s documents.
- The piece is the smallest unit I will count.
- The piece has a weight.
- If there are cases, the standard pack is on with its count, dimensions and barcode.
- If storage is charged per pallet, the pallet is on with its count and dimensions.
- Stacking says it fits and “How it will be charged” is all green.
Troubleshooting
On save it says “The selected client id is invalid.”
- The customer is neither created in this warehouse nor attached to it. Open its record, Warehouses tab, and attach this warehouse (or check that the link is Active).
The customer does not appear in the Client picker.
- Same cause: it is not attached to this warehouse, or you are in another warehouse. Check the top-bar picker.
“The sku has already been taken.”
- That customer already has that SKU in this warehouse, maybe inactive or deleted. Look for it with the customer filter. See Products and packaging levels.
A required-field message appears on the pack or the pallet.
- You turned the level on and its code or count is missing. Fill them in or turn the level off.
Stacking says the pack does not fit on the pallet.
- Some dimension is in another unit (centimeters typed as inches) or the pack is bigger than the pallet. Check the units switch and the dimensions.
“How it will be charged” is still yellow.
- Read the text: it says exactly which level or which data point is missing.
Frequently asked questions
Can I load many SKUs at once?
Yes, with Importing products from CSV: SKU, name, and the piece’s weight and dimensions. The file does not carry the pack or the pallet, so afterwards open each SKU and fill in those levels as in steps 4 and 5.
Can I change the packaging later?
Yes. Stock is kept in pieces and does not change; what changes is how it converts to cases and pallets from then on. Charges already generated are not recalculated.
Does the code I give each level matter?
Not for charging: the system recognizes each level by its place on the ladder (piece, pack or pallet), not by its text. Use the code that is clear to the operator and the customer: it is what prints on receipts, shipments and documents.
Need help?
If something did not work as expected, our support team can help you.
Was this article helpful?